|
Manners Are you tired of your children eating with their fingers? Do you constantly remind your kids to say “Please” and “Thank You”? Do you need to train your little ones to sit still at the table for an upcoming wedding or fancy party? In short, do your children need to learn some manners? If the answer to any of these questions is a resounding “YES!” then this is the Theme Day for your family! What better way to teach etiquette to your children than by making it fun! Print out the Family Theme Day Planner and decide which activities you’d like to do and in what order.
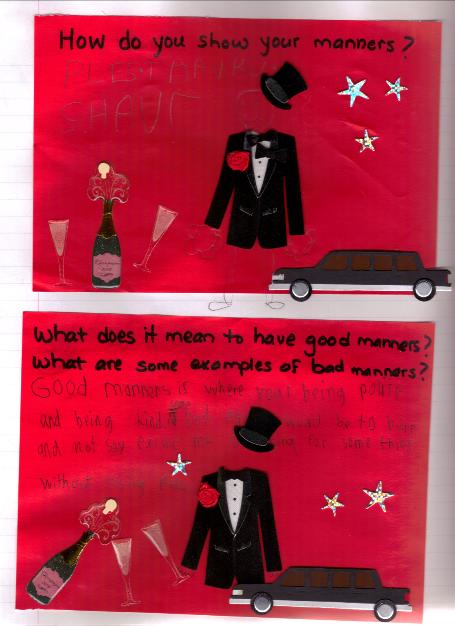
INTRODUCTORY DISCUSSION: Manners are more than just knowing the magic words. Use this Theme Day as an opportunity to talk about respect. We use manners to show respect to others, to make them feel good and happy, and to show that we deserve respect, too. SCRAPBOOK ACTIVITIES: COLORING PAGES: Print out my “Mind Your Manners” Colouring Page. JOURNALING QUESTION PROMPT: Write out one or more of the following questions in your Family Theme Day Scrapbook or on a piece of paper to glue in your scrapbook: What does it mean to have good manners? What are some examples of bad manners? How do you show your manners? Choose the level of your child: ¨ Toddler – discuss the answer(s) out loud first and have your child draw a picture of the answer ¨ Preschooler/Kindergartener – discuss the answer(s) out loud first and write the answer down for him/her leaving one word for him/her to write out himself/herself with your help. You could also encourage him/her to draw a picture as well. ¨ Early Grade School – have your child either write out the answer himself/herself (encourage phonetic spelling) without your help, or offer to help with spelling each word out loud one word at a time. ¨ Grade School – have your child write a sentence or two on his/her own and then read over and discuss the response. (You decide whether to correct the spelling or not) ¨ Older Child – have your child write a longer response (paragraph). ¨ As A Challenge – instead of a question ask your older child to write a story or a poem about good or bad manners. PUZZLES: Print out my Manners Word Search: Easy Manners Word Search or Difficult Manners Word Search.
Check here for the answer keys: Easy Manners Word Search Key or Difficult Manners Word Search Key.
BOOKS: Raid your child’s bookshelves to find any books about manners, good or bad. OR Go to the library with your child to find some books about manners. OR Go to the library on your own to find books about manners from both fiction and nonfiction to have already on hand for your theme day. Many libraries allow you to go online and search for titles based on subject (search for “manners” under “children’s books”). Reserve them if you can to save time.
Here are some picture books about manners:
· Are You Being Good?, by Cari Best and illustrated by G. Brian Karas, Melanie Kroupa books, 2005 – Little Roberts joins his parents and big sister at a special celebration for this Great Grandmother’s 100th Birthday. This would be a great book to read before taking your little one to a big even like a wedding.
· Are you Quite Polite: Silly Dilly Manners Songs, by Alan Katz and David Catrow, Margaret K. McElderry books, 2006—Funny songs (or poems if you don’t know the tunes for some of them) with equally funny illustrations to teach proper manners.
· Being a Pig is Nice: A Child’s Eye View of Manners, written by Sally Lloyd-Jones and drawn by Dan Krall, Schwartz & Wade Books, 2009—A little girl imagines what it would be like to be different animals who don’t need to use manners.
· Emily’s Everyday Manners, by Peggy post and Cindy Post Senning, Ed. D. And illustrated by Steve Bjorkman, Collins, 2006 – Emily and Ethan show us how they use manners every day to make their friends and family feel good.
· Manners Can Be Fun, by Munro Leaf, Universe, 2004—This is an old book (first published in 1036) that uses simplistic stick drawings and is really quite good in its funny ability to teach good manners.
· Manners Mash-up: A Goofy Guide to Good Behavior, by fourteen illustrators, Dial Books for Young Readers, 2011 – Each two page spread is written and illustrated by a different person giving each manner lesson its own unique twist and making this a fun book to read together with your children.
· Mind Your Manners, B.B. Wolf, written by Judy Sierra and illustrated by J. Otto Seibold, Alfred A. Knopf, 2007 – B.B. Wolf follows the advice of his friend crocodile when he is invited to a storybook tea at the library.
· Mother Goose Manners, by Harriet Ziefert and illustrations by Pascale Constantin, Blue Apple Books, 2008 – Each page of this Mother Goose book provides a nursery rhyme and then when you life the flap it shows the proper manner that the nursery character should have done.
· Please Say Please! Penguin’s Guide to Manners, by Margery Cuyler and Will Hillenbrand, Scholastic Press, 2004 – Penguin’s has invited his animal friends over for dinner. Each page offers a question about manners that seems silly allowing your child the opportunity to say “NO!” before you turn the page to reveal the true manner.
· Thankyouplease, by Pierre Winters & Barbara Ortelli, Clavis, 2010, Nina is an impolite little girl until she discovers in the hole of a tree trunk the circus of the ringmaster Thanyouplease who teaches her about the magic of manners.
· Yes, Please! No, thank You!, by Valerie Wheeler and illustrated by Glin Dibley, Sterling Publishing Co., 2005 – This is a simple but fun book to get your kids to practice saying “Yes, please!” and “No, thank you!” as it presents the phrases as the answer to a game!
Try to find some of these nonfiction/learning titles:
· Don’t Slurp Your Soup! A First Guide to Letter Writing, E-mail Etiquette, and Other Everyday Manners, by Lynne Gibbs and illustrated by John Eastwood, McGraw-Hill Publishing, 2002 – This is a great review of all sorts of manners.
· Now We Know About...Good Manners, by Deborah Chancellor, Crabtree Publishing Company, 2009 – This nonfiction book uses photographs and easy text to discuss different aspects of having good manners.
· Emily Post’s Table Manners for Kids, by Peggy Post and Cindy Post Senning, Ed.D., Collins, 2009 – This would be a good book for older kids as it has more text than pictures and it does offer a lot of good advice.
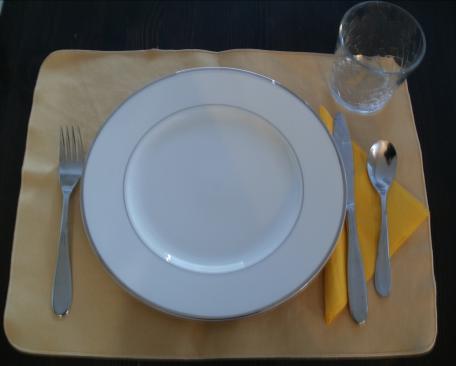
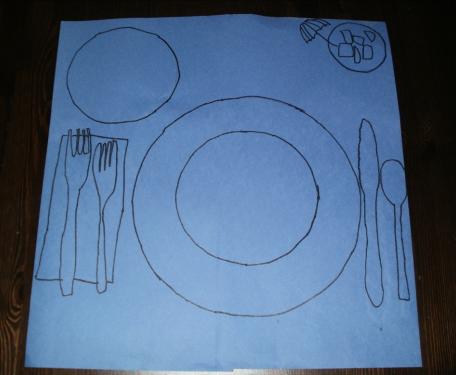
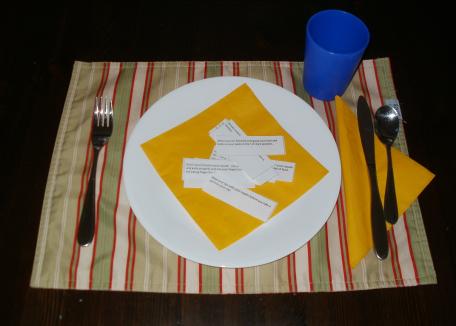
CRAFTS: FORMAL PLACE SETTING PLACE MAT: NOTE: What I loved about this craft is that it created a template for my boys for when they were setting the table. So practical and helpful! Materials: A large sheet of paper, dishes to trace around (plates, bowl, fork, spoon, knife, glass), a napkin, a pencil, crayons.
Step 1: In the middle of the paper have your child trace a plate. Step 2: In the middle of the drawing of the plate have your child trace a bowl. Step 3: To the left of the plate have your child trace a napkin.
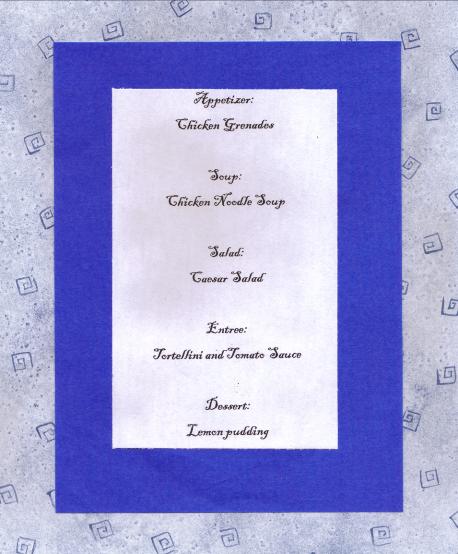
MENU CARD: NOTE: We made this card after we determined the food for our “formal Dinner” (read below under “FOOD” for more detail). Materials: White paper, coloured paper or pretty scrapbook paper, cut into rectangles of varying shapes to fit one on top of the other, markers, glue stick.
Step 1: After you’ve decided on your “formal menu” have your child write the menu on a piece of white paper that fits on top of the other piece of coloured paper. My boys wanted to type it on the computer using a fancy font. Step 2: Glue the menu on top of a piece of coloured paper. Step 3: Glue those two pieces of paper on top of another piece of coloured or decorated paper to create a frame effect.
PUNCTUALITY CLOCK: NOTE: Explain to your children the value of being punctual, how it shows respect for the person you are meeting, how it enables the others you are meeting to proceed with their plans on time, and how it shows that you are a responsible and reliable person.
Materials: Paper plate, coloured paper, markers or crayons (optional: stickers with numbers on them), construction paper, child safe scissors, a pin, paper fastener or scrapbooking brad.
Step 1: Have your child write the numbers 1 to 12 on the paper plate like the face of a clock. We chose to use shiny stickers. Step 2: Cut out two thin rectangles from the construction paper (choose a different colour from your plate) to be the hands of the clock. Cut a triangular tip at the end of each rectangle. Step 3: Use a pin (adult step only) to poke a hole at the bottom of the two rectangular clock hands and also to poke a hole in the middle of the paper plate. Step 4: Insert the paper fastener or scrapbooking brad through the paper hands and ten through the paper plate. Turn the plate over to bend the paper fastener outward so it stays in place. Now the hands can be turned to a certain time so your little ones will know when it is time to leave for a special event.
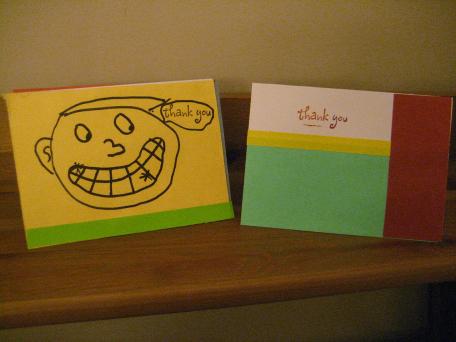
THANK YOU CARDS: NOTE: One of the easiest ways to show manners is by thanking someone. Make this craft for someone special or save it for another occasion like after your child’s birthday. Materials: Card stock (we use blank cards found at a craft store but any construction paper cut into a rectangle and then folded over will work), coloured paper or (pieces of scrapbook paper or wrapping paper), stickers, stamps, crayons or markers.
Step 1: There are no real steps to this card as your child can use his/her imagination to create these cards. Here are some choices to get your child started: a) Draw a picture on the front of the card and colour it; b) Cut out pieces of coloured paper or scrapbook paper or fancy wrapping paper and glue them to the front of the card; c) Use assorted stickers to decorate the front of the card; d) Use assorted stamps and coloured ink pads to decorate the front of the card; e) Don’t forget to write the word “THANK YOU” on the front of the card, or use a stamp with the words on it.
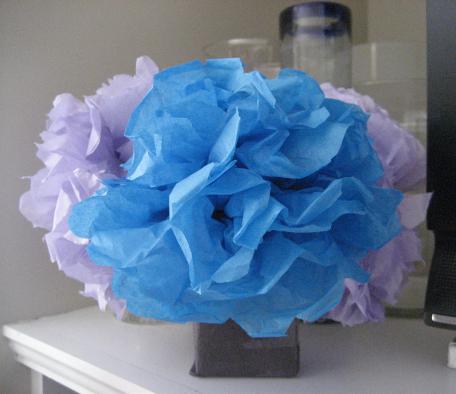
TISSUE PAPER FLOWER - GIFT TO THE HOST/HOSTESS:
NOTE: Teach your children about the etiquette of bringing a gift over to someone’s’ house as another form of saying thank you.
Materials: Tissue paper (6 to 8 pieces per flower), green pipe cleaners, child safe scissors, empty soap box, wrapping paper or coloured paper, clear tape.
Step 1: Wrap an empty soap box (or other such box like a Jell-O box) with wrapping paper or coloured paper, using child safe scissors and tape. This will be the vase. Step 2: Lay 6 or 8 pieces of tissue paper on top of each other. Step 3: Make accordion folds (over and under) to the pile of tissue paper until you’ve reached the end (make the folds about 1/2 inch or 1 to 2 cm in width). Step 4: Twist the green pipe cleaner around the middle of the folded paper. Step 5: Fold the accordion-style strip of paper in half so that the pipe cleaner is in the middle. You may have to slide the pipe cleaner a bit to ensure it is perfectly centred. Step 6: Use the scissors to cut rounded ends on both ends of the tissue paper. Step 7: Fold the tissue strip open to create a rounded flower shape (with the string in the middle still). Step 8: Gently pull each layer of tissue paper away from the others to create a full round flower. Step 9: Repeat these steps for each flower you want to make. We made three. Step 10: (Adult step) Make slits in the top of the wrapped box (vase) and then insert the pipe cleaners into the slits as if they were stems of flowers inserted in a vase. Step 11: Give your beautiful gift to someone who has you over for lunch or dinner.
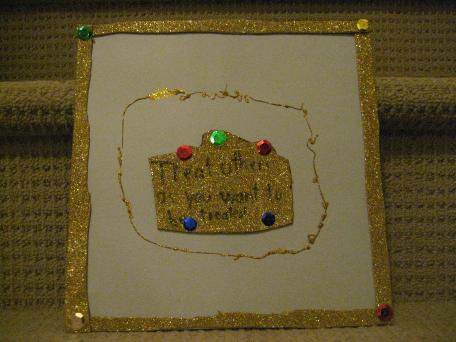
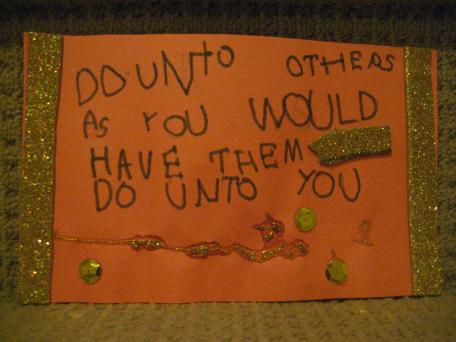
GOLDEN RULE POSTER: NOTE: The best way to summarize why we all need to use proper manners to through the golden rule! “Do unto others as you would have them do unto you!” This is a philosophy taught in many different religions and cultures throughout the worlds. For a beautiful children’s picture book that shows how this view is worldly try this title: · The Golden Rule, by Ilene Cooper and illustrated by Gabi Swiatowska, Abrams Books for Young Readers, 2007 – This book is gorgeously illustrated and has a grandfather and a grandson discussing what the golden rule is and how it is worded around the world. Then the two discuss ways to practice the golden rule and ends with the simple lesson that the golden rule “begins with you!” You can also check here to see how different cultures and religions word the Golden Rule: http://www.teachingvalues.com/goldenrule.html Materials: Paper, makers or crayons, gold glitter and white glue, glittery stickers (optional) Step 1: Have your child write out the Golden Rule onto their chosen paper. Step 2: Let your child use his/her imagination to decorate the poster with the glittery stickers or craft glitter.
FOOD: NOTE: You can discuss foods and how to eat them using proper manners but the best way to really get kids to understand the rules of eating is to show them and have them practice. To do this have a “Formal Dinner” (check below under “EXTENDED ACTIVITIES” for details) and begin your preparations by making a menu together. Once the menu is set you can make the above Menu Card under CRAFTS. NOTE: Here are the basic courses for a formal five course meal - appetizer, soup, salad, entree and dessert. SNACK: Bread and Butter: This may seem like a strange snack but for this Theme Day it is the perfect opportunity to start teaching your child how to use a knife (a blunt butter knife). The proper etiquette for eating a roll and butter is to break off a piece of the roll and spread it with butter. LUNCH: Soup: Make your child’s favourite type of soup for lunch and then teach him/her how to eat soup properly. You dip the spoon into the soup and slowly scoop the liquid by moving the spoon away from yourself, towards the back of the bowl. You then touch the rim and lift the spoon up to your mouth to sip it, not slurp it! If you are sipping the soup you will not be inserting the whole bowl of the spoon into your mouth which is proper etiquette. DINNER: Serve one of your child’s favourite dinners but use this opportunity to practice using a knife and fork or what to do if there is more than one fork by your table setting (use the utensil furthest from you first). Teach your child to use the knife and fork for cutting food in either the American Style or Continental/European Style. For American Style, the knife is held in your right hand and the fork in left hand holding the food. After a few bite-sized pieces of food are cut, place the knife on the edge of the plate. You then eat the food by switching the fork to right hand (unless you are left handed). For Continental/European Style, the knife is held in your right hand and the fork in your left hand. Food is eaten with the fork still held by the left hand. The difference is that you don't switch hands. Food is eaten with your fork in your left hand, with the prongs curving downward. Both utensils are kept in your hands with the tines pointed down throughout the entire eating process. If you take a drink, you do not just put your knife down. Instead you put both utensils down into the resting position which is a cross shape with the fork over the knife. Use dinner as an opportunity to teach your child how to use a napkin as well, placed on your lap. Once dinner is complete teach your child to place the knife and fork on the plate in the five o’clock position. I’ve also taught my children to carefully take their plates to the sink after dinner at our house and at others (this obviously doesn’t apply to formal dinners at weddings or restaurants where servers do that for the diners).
LEARNING ACTIVITIES: FAMILY BRAINSTORM: GOOD MANNERS IN DIFFERENT SITUATIONS: Print out my How to Show Good Manners Worksheet and together as a family fill in the spaces. You will be discussing what it means to be a “good sport” (manners while playing or watching sports), how to show manners at school (raise your hand, don’t yell, please and thank you), and how to be a good guest (knock on the door when you arrive, respect other’s property, offer to help, arrive on time, etc.) and how to be a good host (make introductions, keep conversation going, thank your guests for coming, etc.). HOW WE SHOW MANNERS: Print out my “How Do We Show Manners” Worksheet and as a family come up with the answers. You will be discussing how we show manners through our words (please and thank you), body language and actions (posture, using utensils properly, holding the door open, taking your shoes off at the door, etc.) and appearance (dressing neatly and appropriately, having neat hair and a clean face). LANGUAGE MATCHING: See if your family can match the words “Please and Thank You” to the appropriate language by printing out my Language Matching: Manners Worksheet. Check here for the answer key: Language Matching Key. If there are any errors, I apologise. I used these two website primarily to make the worksheet: www.tanslate.google.com and http://www.thank-you-note-samples.com/languages.html. WEBSITE: For more information about manners and children try this website: http://life.familyeducation.com/manners-and-values/parenting/34452.html
FOR FUN: GAMES: ROLL PLAY: A fun way to practice proper manners is to roll play. This is especially useful to teach phone manners. Practice calling your child with play phones and have your child answer it and also have your child practice calling you. Practice different scenarios like what to do when someone isn’t home or when someone calls the wrong number. As well, practice not yelling. “HEY MOM!!!! THE PHONE’S FOR YOU!!!” Some phrases to teach are “one minute please; I’m sorry you’ve got the wrong number; may I please speak to…) PRACTICE MAKES PERFECT CARDS FOR DINNER MANNERS: Print out my Practice Makes Perfect Game Cards. Cut out the cards and give two to each person around the table. Everyone is to secretly read the instructions on the card (or whisper the instructions to your littlest family members) and then throughout dinner try to practice what the card says. Once dinner is finished take turns guessing what each others’ cards said. MANNERS OR NO MANNERS GAME: Print out my Manners or No Manners Game Cards and cut them out. You can play this game while you are eating dinner or at any time. Take turns reading out a card and let everyone guess what the correct answer is before telling them whether they are right or now.
EXTENDED ACTIVITIES: AUDIO VISUAL: Search through your child’s DVD/ video collection (or visit your local library before hand or the Video Store) to find your child’s favourite shows with about manners.
Try to find these titles:
· The Berenstain Bears : Bears Mind Their Manners!
· Look Mom! I Have Good Manners, Mazzarella Media, 2004
FAMILY ACTIVITIES: FORMAL DINNER: Have a formal dinner for your family. Let your children help you plan a formal five course meal (appetizer, soup, salad, entree and dessert). Keep things fairly simple so the cooking won’t be too hard that day (don’t be afraid to use boxed or canned soup for instance, or a premade dessert). Your children can make the Menu Card following the directions above under CRAFTS. On the day of the dinner have your children set the table. Use your fanciest plates and placemats. Light candles or place flowers in the middle of the table (you could use the tissue flower craft to decorate the table). Dress up nicely and then sit down and enjoy each course...using proper manners of course! TEA PARTY: Another way to practice manners is to have a tea party. If your child has a toy tea set, use that. Set the table and dress up nicely and don’t forget to use your manners.
|
|
Get set to practice your manners... |
|
Journaling |
|
Place Setting Place Mat |
|
Menu Card |
|
Punctuality Clock |
|
Thank You Cards |
|
Tissue Paper Flowers as a Thank You gift |
|
Golden Rule Posters |


|
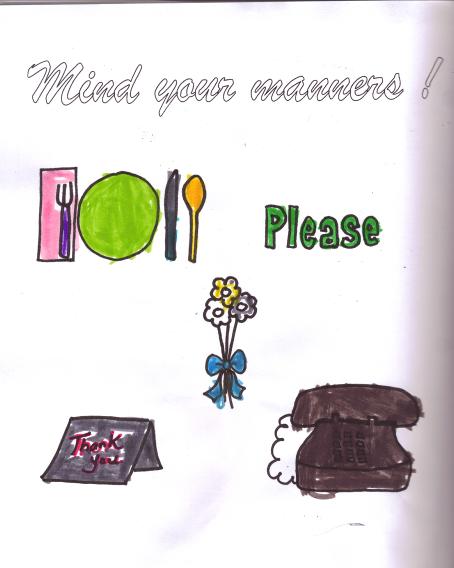
Colouring Page |
|
Practice Makes Perfect Cards |