|
Japan Japan is a country with a fascinating culture full of tradition and has many festivals, including the many Cherry Blossom Festivals that take place in various cities usually in March, April or May. You may want to choose a springtime month to learn about Japan and focus on the cherry blossoms, but really any time is a good time to learn about a different country. Have fun exploring The Land of the Rising Sun. Print out the Family Theme Day Planner and decide which activities you’d like to do and in what order.
INTRODUCTORY DISCUSSION: The Japanese name for Japan is Nippon and Nihon. Both of these words literally mean “the sun’s origin” and are often translated as “Land of the Rising Sun.” Take out a globe or atlas before you have this Theme Day or go online to show your child where Japan is and compare it to where you live.
SONGS: Kimigayo is the National Anthem of Japan. For information on the Japanese National Anthem check here: http://en.wikipedia.org/wiki/Kimigayo. To hear the Japanese National Anthem being preformed as well as view the English translation of the lyrics check here: http://www.youtube.com/watch?v=29FFHC2D12Q. A fun song my youngest recommended for this Theme Day is “Ninjas”, by the Barenaked Ladies, from their Snacktime album for kids.
SCRAPBOOK ACTIVITIES: COLORING PAGES: You can find many free colouring pages online by using your favourite search engine and typing in “Japan Coloring Pages” or print out my Japan Coloring Page. JOURNALING QUESTION PROMPT: HINT: For International Theme Days, I like to give the journal prompt after we have learned about the country through our reading and crafts, etc. Write out one or more of the following questions in your Family Theme Day Scrapbook or on a piece of paper to glue in your scrapbook: What do you know about Japan? What have you learned about Japan? If you visited Japan what would you like to do and see? Choose the level of your child: ¨ Toddler – discuss the answer(s) out loud first and have your child draw a picture of the answer ¨ Preschooler/Kindergartener – discuss the answer(s) out loud first and write the answer down for him/her leaving one word for him/her to write out himself/herself with your help. You could also encourage him/her to draw a picture as well. ¨ Early Grade School – have your child either write out the answer himself/herself (encourage phonetic spelling) without your help, or offer to help with spelling each word out loud one word at a time. ¨ Grade School – have your child write a sentence or two on his/her own and then read over and discuss the response. (You decide whether to correct the spelling or not) ¨ Older Child – have your child write a longer response (paragraph). ¨ As A Challenge – instead of a question ask your older child to write a story or poem about Japan (or a story that takes place in Japan). PUZZLES: Print out a Japan Word Search: Easy Japan Word Search or Difficult Japan Word Search. Check here for the answer keys: Easy Japan Word Search Key or Difficult Japan Word Search Key.
BOOKS: Raid your child’s bookshelves to find any books that take place in Japan. OR Go to the library with your child to find some books about Japan. OR Go to the library on your own to find books about Japan from both fiction and nonfiction to have already on hand for your theme day. Many libraries allow you to go online and search for titles based on subject (Search for “Japan” under “Children’s Books”). Reserve them if you can to save time.
Try to find some of these nonfiction/learning titles:
· Japan, by Tom Streissguth, Lerner Publications company, 2008—Part of the Country Explorers Series, this is a great book to learn about Japan with your children. It offers photographs, easy text, questions for discussion as you read along, Japanese words, and covers most areas of Japanese life past and present.
· Japan: A Question and Answer Book, by Michael Burgan, Capstone pres, 2005—This book answer twelve basic questions about Japan like “What type of government does Japan have? What is school like in Japan? What major holidays do people in Japan celebrate?” and has easy text making it a good review book for children.
· Japan in Colors, by Sara Louise Kras, Capstone Press, 2009—The large photographs and easy to read text focusing on different aspects of life in Japan through colors makes this a good review book for younger kids.
· Japan the Culture, by Bobbie Kalman, Crabtree Publishing Company, 2001—There are two other books in this series (Japan: The Land and Japan: The People) and for kids looking to learn more about Japan with more detail this series is perfect.
· J is for Kabuki: A Japan Alphabet, written by Gloria Whelan and Jenny Nolan and illustrated by Oki S. Han, Sleeping Bear Press, 2009—Each letter presents a poem about an element of Japan and on the side further factual information is given.
· My Japan, by Etsuko Watanabe, Kane Miller Book Publishers, 2007—although this is technically a picture book because it isn’t really a story and because it is a great look at life in Japan for a child I thought it should be included in nonfiction. My kids were most fascinated by the pages about the bathroom!
· Spotlight on Japan, by Bobbie Kalman, Crabtree Publishing company, 2011—This is a good general review of Japan highlighting the land, its history, and its culture with photographs and easy to read text.
Here are some picture books:
· I Live in Tokyo, written and illustrated by Mari Takabayashi, Houghton Mifflin Company, 2001—This is a neat glimpse into life in Tokyo by following seven year old Mimiko and her five year old brother, Kenta.
· Lin Yi’s Lantern: A Moon Festival Tale, by Brenda Williams & Benjamin Lacombe, Barefoot Books, 2009—A boy is very excited for the moon festival but first must go to the market to help his family prepare.
· The Magic Fan, written and illustrated by Keith Baker, Harcourt, Inc., 1989—Yoshi is a talented builder who is guided by a fan to build fanciful things. I love how the illustrations are made in the shape of the fan and how the fan opens to reveal the fan’s next idea.
· A Pair of Red Clogs, by Masako Matsuno and illustrated by Kazue Mizumura, Purple House Press, 1988—A Grandmother recalls her first pair of wooden clogs.
· Wink: The Ninja Who Wanted to be Noticed, by J.C. Phillipps, Viking, 2009—This is a funny book about a boy who wants to be a Ninja but keeps failing the “stealthy” parts at Ninja School. We loved how he finds out a way to use his talents at the end and the cut out/collage illustrations are great.
For Japanese Folktales and Legends try these titles:
· The Boy Who Drew Cats, retold by Arthur A. Levine and paintings by Frédéric Clément, Dial Books, 1993—elaborate paintings illustrate this legend of a boy whose paintings of cats come alive and saves a temple from a terrible Goblin Rat.
· The Beckoning Cat, by Koko Nishizuka and illustrated by Rosanne Litzinger, Holiday House, 2009—In this account of the lucky cat (which the lucky cat figurines seen in storefront windows and restaurants of Japan are based), the animal helps a young boy and his family.
· The Boy from the Dragon Palace, retold by Margaret read and illustrated by Sachiko Yoshikawa, Albert Whitman & Company, 2011—A cautionary tale in which a poor flower seller learns about not being greedy after a magical wish granting “snot-nosed boy” is given to him from the Dragon King.
· I am Tama, Lucky Cat, by Wnedy Henrichs and illustrated by Yoshiko Jaeggi, Peach Tree,2011—Another account of the story behind the legendary Tama cat; in this case, the cat befriends a monk and saves a samurai’s life.
· The Greatest of All, retold by Eric A. Kimmel and illustrated by Giora Carmi, Holiday House, 1991—When a young mouse asks her father for permission to marry a handsome field mouse the father goes on a quest to find the “greatest of all” to marry his daughter. Can you guess who it is?
· A Tale of Two Tengu, retold by Karen Kawamoto McCoy and illustrated by Koen Fossey, Albert Whitman & Company, 1993—In this humorous tale, two Tengu, Japanese goblins with long noses, argue about whose nose is the greatest.
· Three Samurai Cats, retold by Eric A. Kimmel and illustrated by Mordicai Gerstein, Holiday House, 2003—When a rat takes over a castle, the lord needs a samurai cat’s help, but which one will be successful?
For something different try this:
· Japanese Nursery Rhymes: Carp Streamers, Falling Rain and Other Traditional Favorites, by Danielle Wright and illustrated by Helen Acraman, Tuttle Publishing, 2011—This book comes with a CD so your family can hear them being sung in Japanese.
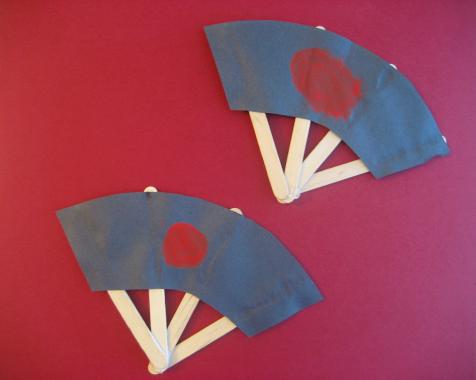
CRAFTS: CRAFT STICK FAN: NOTE: I have modeled this craft after the Japanese war fan which is designed for use in warfare and was used by the samurai. For more information about Japanese War Fans check here: http://en.wikipedia.org/wiki/Japanese_war_fan Materials: Black craft paper, pencil, four craft sticks or popsicle sticks, white glue, red paint and paint brush, wax paper.
Step 1: Fan the four craft sticks out on a piece of black paper so that the bottom of each of the sticks are together (layering them). Lightly draw a fan shape (arch) that will fit the sticks. Step 2: Cut out the fan shape from the black paper and then have your child paint a red circle in the middle of the shape. Step 3: Work on top of wax paper for the next two steps. Use white glue to attach the four craft sticks together at the bottom where they intersect. Step 4: Apply glue about midway up each craft stick and lay the cut out piece of black paper on top. Let dry!
STYROFOAM “WOOD” BLOCK PRINTING: NOTE: Ukiyo-e is the main artist genre of woodblock painting in Japan. For more information about Ukiyo-e check here: http://en.wikipedia.org/wiki/Ukiyo-e Materials: empty and cleaned Styrofoam flat container, a toothpick, paints and a paint sponge, white paper, wax paper, newspaper or cloth to cover work space, art smock or old clothes to wear. Step 1: I showed my kids some examples of Ukiyo-e and asked them to think about a landscape (setting) they would like to use for their art. My eldest choose a tree and a mountain and my youngest wanted to do the sea. Step 2: have your child gently press the toothpick into the bottom of the Styrofoam to draw a landscape picture. Step 3: Pour some paint onto the wax paper and then use the paint sponges to dab paint onto the Styrofoam (not too thick...you may have to press once on a separate sheet of paper). My youngest choose two shades of blue and was more abstract while my eldest wanted to be very literal with his colours carefully dabbing appropriate colours to each part of his carving. Step 4: Now lift the Styrofoam “woodblock” and press onto a blank sheet of paper. Continue to press all over ensuring that every part is transferred to the paper. Step 5: Carefully lift the Styrofoam off the paper to reveal the print!
INK WASH PAINTING: NOTE: Sumi-e is Japanese ink wash painting. For a great website about Sumi-e and to see some examples check here: http://sumi-e-painting.com/sumi-e-einfuehrung-gesamt.htm Materials: black paint, water, paper bowl, paint brushes (we happened to have some actual brushes from Japan as my husband’s parent go there often).
Step 1: Put some black paint into the paper bowl and enough water to make it watery yet still dark (like ink). Step 2: Have your child choose a nature subject. We looked at pictures of bonsai trees and bamboo. Step 3: Let your child paint using the “ink.” Once it is dry display!
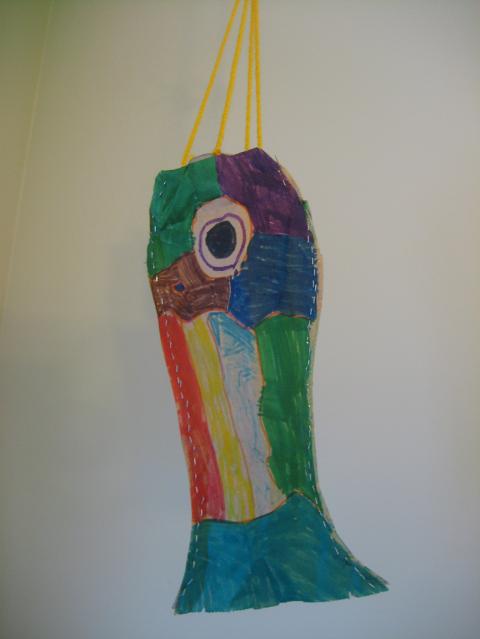
CARP WIND SOCK: NOTE: Koinobori are carp (fish) shaped wind socks flown on May 5th for Children’s day, called Kodomo no Hi. For more info and to see pictures of some of these wind socks check here: http://en.wikipedia.org/wiki/Koinobori Materials: A paper lunch bag, child safe scissors, markers, a empty toilet paper roll, tape, stapler, glue, yarn or string.
Step 1: Trace a fish onto one side of a paper bag with the tail at the open end of the bag and the end at the bottom. Step 2: Carefully cut out the fish keeping the bottom of the bag intact. Remove the scraps of paper that will be left over. Step 3: Have your child colour the fish with markers on both sides. Be sure to include a big eye! Step 4: Carefully fold open the bottom of the bag and trace the bottom of a toilet paper roll onto it. Cut the circle out. Step 5: Cut the toilet paper roll about a third of the way up and then cut little tabs along one end. Step 6: Carefully stuff the paper roll into the circle you cut out on the bottom of the paper bag. This will be the fish’s mouth. Fold back the tabs to keep the mouth in place in the cut out circle and tape to the paper bag. Step 7: This part is a bit tricky. Staple the bag closed at the bottom of the bag to seal it and attach the sides. Then apply some glue along the edges of the paper bag press down and staple all along the bottom and top. Step 8: Paper bag trace fish and cut out - glue together at seams – paper roll mouth stapled in m hole punch for yarn and attach to stick. Step 9: Hole punch four holds onto the toilet paper roll mouth and then tie four pieces of yarn to it. Tie these four pieces of string together onto a longer piece of string and once the glue has dried you can gently open the fish up via the tail and hang the fish form the ceiling (we used a thumb tack). You could hang it outside but this craft is not water proof so notice the weather!
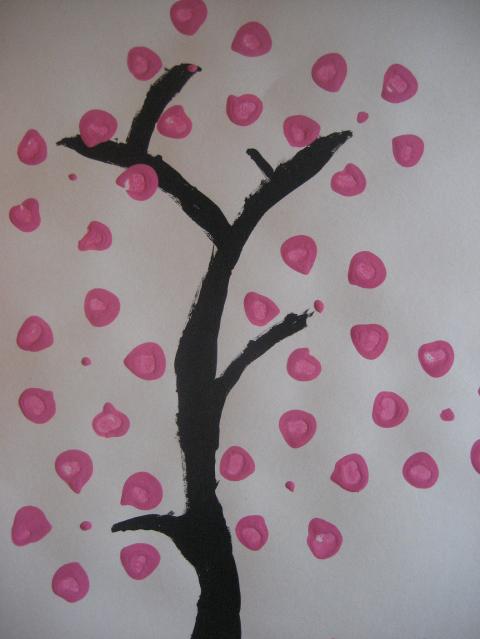
CHERRY BLOSSOM from POP BOTTLE: NOTE: From the end of March to early May Cherry Blossoms (sakura) bloom all over Japan and the blossoms only last a week or two so this is a very beautiful and special time called Hanami (which means flower viewing). For more information check here: http://en.wikipedia.org/wiki/Hanami NOTE: I found the idea for this craft on Pinterest. For the original link check here: http://alphamom.com/family-fun/holidays/cherry-blossom-art-from-a-recycled-soda-bottle/ Materials: An empty 2 litre bottle of soda, bright pink paint, black paint, construction paper, paint brush, a paper bowl to hold the paint, wax paper or pallet for the black paint, newspaper or plastic to cover your work area, an art smock or old clothes to wear. Step 1: Have your child paint the branches of a tree onto the white paper. Step 2: Gently press the bottom of the soda bottle into the pink paint (in the paper bowl) and then carefully press that onto the picture of the tree branches. The bumps on the bottom of the pop bottle will create a pink flower stamp on the paper! Step 3: Repeat until your child feels the picture is complete and let it dry. Don’t forget to display this beautiful piece of art!
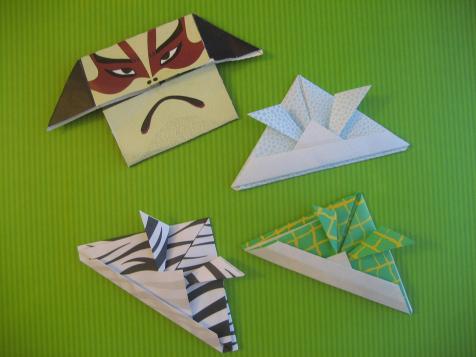
ORIGAMI: NOTE: Origami is the traditional art of Japanese paper folding and probably the most well known Japanese craft used by children around the world so of course I had to include it. For some history check here: http://en.wikipedia.org/wiki/Origami I have very little skill in this art and did not create my own craft here. Instead I have relied on other sources. My boys were interested in the Samurai warriors so we made small origami samurai hats. My in-laws also gave my children some origami books with special paper so I have included one we made of a Samurai warrior in the photo. Many craft stores carry origami paper or you can make your own by cutting a perfect square out of scrapbook or coloured paper. Origami Samurai hat: For easy to follow instructions go here: http://www.origami-fun.com/origami-samurai-hat.html For more origami check the rest of this site: www.origami-fun.com
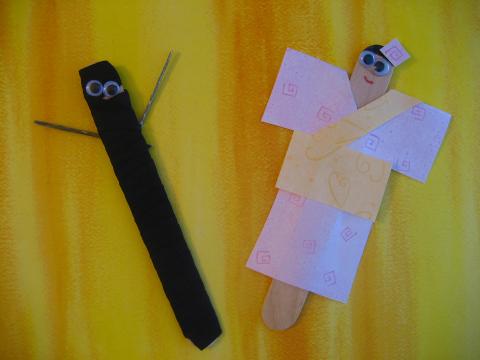
NINJA CRAFT STICKS and GEISHA CRAFT STICKS: NOTE: Our delve into Japan had to include Ninja since my youngest just loves them (thanks to LEGO Ninjago) so I came up with this simple craft. NOTE: A ninja was a covert agent of feudal Japan (http://en.wikipedia.org/wiki/Ninja) and geisha are traditional Japanese female entertainers (http://en.wikipedia.org/wiki/Geisha). Materials: Wide craft sticks, googly eyes, black ribbon or fabric, colourful patterned paper, toothpicks, black and red marker. Draws eyes closed add nice scrap paper pattern cut into
SPIN DRUM: NOTE: I cannot find a photo of the craft we made. I also cannot find the craft so I cannot retake the picture! Sorry about that! When I do find it I will post the picture on Facebook under More Crafts: https://www.facebook.com/media/set/?set=a.536331356394349.132868.194379807256174&type=3 I hope my instructions are easy enough to follow... NOTE: Den-den-daiko is a Japanese pellet drum (http://en.wikipedia.org/wiki/Den-den_daiko). Materials: Two cleaned plastic lids of the same size (we used sour cream lids), packing tape, two wooden chop sticks (from a Japanese or Chinese restaurant), yarn, two large beads, paint and brushes. (we used red and black paint).
Step 1: Have your child decorate the inside part of the plastic lids (the writing on the other side will be covered once the craft is made). My sons each painted a side. Let dry. Step 2: Cut two long pieces of string. Knot one end on each string and thread a bead and then tie a knot behind the bead to keep it in place. Now trim the two pieces of string/yarn so that if placed from the middle of the lid outward the other end of the string (with the bead) could fling back to touch the lid. This took a bit of trial and error on my part so it is best to start with a longish piece of yarn. Step 3: Tie the two strings to the chop stick. You could now create a “T” with the chopstick as the vertical line and the two strings as the horizontal with the two beads at each tip. Step 4: Once the paint on the plastic is dry turn one lid over to the side with the writing and tape a chop stick (if you want to be VERY safe tape the pointy end) to the plastic. Secure it with the packing tape. It should look like a lollipop with the chopstick as the stick and the lid as the candy! Step 5: Fold several pieces of packing tape over to create double sided tape and place all over the lid and then squish the other lid over top to sandwich the chopstick and string. Step 6: To make the drum work roll the chop stick between your palms to make the yarn swing and the beads beat against the lids!
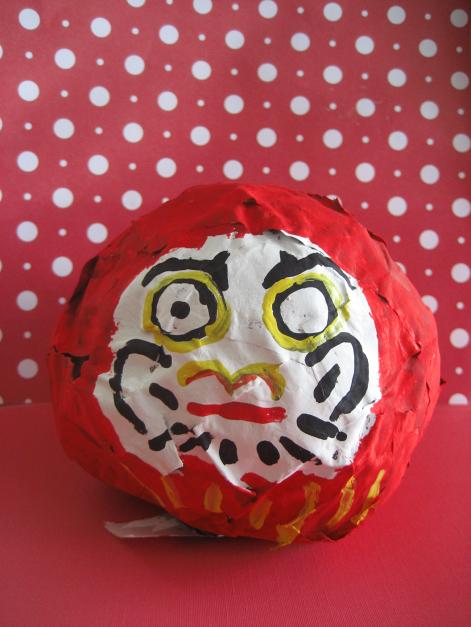
DARUMA DOLLS: NOTE: There are many types of Japanese dolls: Okiagari-koboshi, Daruma dolls, kokeshi dolls. I choose the Daruma or Dharma doll because they are a symbol of good luck and perseverance. Dharma dolls are bearded men usually painted red that are hollow with a weighted bottom so that it will always return to an upright position when tilted. The eyes are blank when they are sold with the idea that the new owner paints in one eye when they have set a goal and then paints the other when the goal is reached. This is to motivate you as every time you see the one eyed Daruma you recall your goal and want to work towards it! You can read more here: http://en.wikipedia.org/wiki/Daruma_doll
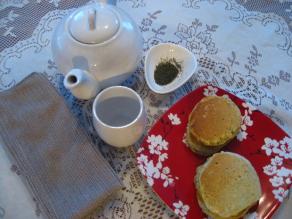
Materials: Strips of newspaper, a balloon, a paste made of equal parts white glue and water (put in a paper bowl or cup), an old paint brush, a paper bowl and wax paper, paints and brushes, newspaper or plastic to cover work area, art smock or old clothes. Step 1: Blow the balloon up just a little bit to create a round sphere and tie a knot to secure the air in. Step 2: Set a piece of wax paper over the paper bowl and rest the balloon in it so it will not roll around. Step 3: Make your simple paste (glue and water) and glue strips of paper all over the balloon using the old paint brush. Step 4: Let the glue dry. Our balloon deflated during this step so it sunk in a bit and created its own base. If this doesn't happen to you once the glue is dry, pop the balloon and push down gently on the sphere to create a flatter base. If this doesn't work you can create a little hole and weigh the sphere down with dried beans and then seal the hole with more paper mache. Step 5: Paint the sphere all in white to cover up the newprint. Step 6: Once dry paint a face on the doll—two big blank eyes, a beard and red around the face will due. Your child can embellish with yellow as well. Step 7: Have your child set a goal and paint in one of the eyes! MANGA: NOTE: Manga are Japanese comics (http://en.wikipedia.org/wiki/Manga) and my kids love to take these books out of the library to draw characters. There are many “How to Draw Manga” books out there. Go to your local libray and see what you can find. We like those by Christopher Hart. FOOD: For a book with Japanese recipes, further crafts and more information about Japanese culture try this: Recipe and Craft Guide to Japan, by Juliet Haines Mofford, Mitchell Lane Publishers, 2011 - DRINK: Green Tea: This is an easy thing to prepare for your kids to give them a taste of a different culture. If you worry about the caffeine you can easily find caffeine free green tea at stores. NOTE: A fun way to enjoy your green tea with your kids is to have a Japanese Tea Ceremony (http://en.wikipedia.org/wiki/Japanese_tea_ceremony). I found a great site that offered steps to have a tea ceremony with your kids. Follow these simple directions: http://kidscookingwithcricket.blogspot.ca/2008/03/japanese-tea-ceremony.html This is really fun to do with kids and is a great way to emphasis the beauty of cultural traditions. We set up pillows on the floor of our living room and used the coffee table for our ceremony. SNACK: Serve some wagashi (Japanese sweets) with your green tea. These are traditionally served to counter the bitter flavour of the tea. If you live near an Asian market you may be able to purchase some wagshi or even some Dora Yaki. If not, then make your own Green Tea Dora yaki (miniature pancakes) from this recipe (the same website as the tea ceremony above): http://kidscookingwithcricket.blogspot.ca/2008/03/japanese-tea-ceremony.html These are basically green tea pancakes which I sandwiched with peach jam.
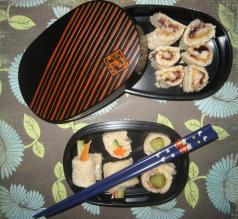
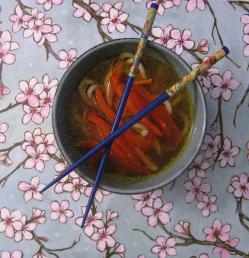
LUNCH: Miso Soup can be ordered at any Japanese restaurant but I found a dry package in the Asian section of my local grocery store. My youngest loves this soup but my eldest tolerates it and picks out the tofu! Mock Sushi sandwiches: I made three types. 1) With carrot and cucumber. I found the recipe for these (rolled bread filled with veggies and dressing) here: http://www.marthastewart.com/269555/sandwich-sushi 2) With pickle and lunch meat. Here is the link for this recipe: http://www.mommygoggles.com/sara-lee-recipes/ 3) With peanut butter and jelly. Here is the recipe link: http://hiphostess.blogspot.ca/2011/08/pb-sushi-style.html DINNER: You could always go out for an actual Japanese restaurant for authentic Japanese food for this Theme Day. It could be a bit of a field trip! If you have no idea what to order try a Bento box. …. Try some Sushi for dinner – either sashimi or maki (if you don’t like the thought of raw fish try some maki rolls which are rice rolls and you can often get them without fish like kappa maki which is made with cucumber). I once tried to make real sushi with a friend and while it was tasty they certainly didn’t stick together very well nor did they look very pretty. You can make your own if you dare or simply order from a Japanese restaurant or even get some from a grocery store. We have one near us that has chefs making the sushi rolls fresh each day. Japanese Udon (Noodle) Soup – again you could order this from a Japanese restaurant but you could also find an easy recipe online or in a cookbook. This might be something your kids will like to eat if they are fans of soup. Here is the recipe I used: http://recipes.howstuffworks.com/japanese-noodle-soup-recipe.htm Less adventuresome kids would probably like Teriyaki Chicken or Beef served with rice. This is a go-to for my eldest who is not a big sushi fan (unlike his little brother). This is easy to make on your own as grocery stores all carry bottles of teriyaki sauce. For a simpler idea for those kiddos who may be adverse to trying something new serve some rice and steamed veggies with soy sauce.
DESSERT: For an idea of what a traditional Japanese dessert would be like check out this website with videos on how to make the desserts: http://www.ifood.tv/network/japanese_dessert/recipes. To try some of these desserts I’d recommend ordering form a Japanese Restaurant as these all looked fairly difficult to make and had ingredients I wasn’t sure I could find. However, I did find this website: http://web-japan.org/kidsweb/cook/wagashi/index.html and these little mashed sweet potato birds look easy enough to make. We have not yet made them but I hope to one day and then shall post the results on facebook. Rice Krispie Sushi: I opted for another mock sushi recipe for dessert. Here’s a link to give some ideas on hwo to make them—I just made rice krispie treats and used liquorice in some and Swedish fish candies and stripes of fruit bars on the others: http://www.foodnetwork.com/recipes/food-network-kitchens/april-fools-sushi-rice-krispies-nuggets-recipe/index.html For a Japanese inspired (North American) treat make some Japanese Flag Cookies. Use your favourite sugar cookie dough recipe and then cut out rectangles and bake these. Then decorate with red icing to create the red circle in the middle of the cookie for the flag. For something equally non-Japanese tasting but fun make some Ninja Bread Men! Use a regular gingerbread cookie cut out with your favourite gingerbread dough and then decorate with the ninja mask on. My friend found some actual Ninjabread Men cookie cutters which we borrowed to make some ninja cookies on the move! Check our More Goodies Facebook Album for a photo of both of these cookies: https://www.facebook.com/media/set/?set=a.510290308998454.127299.194379807256174&type=3
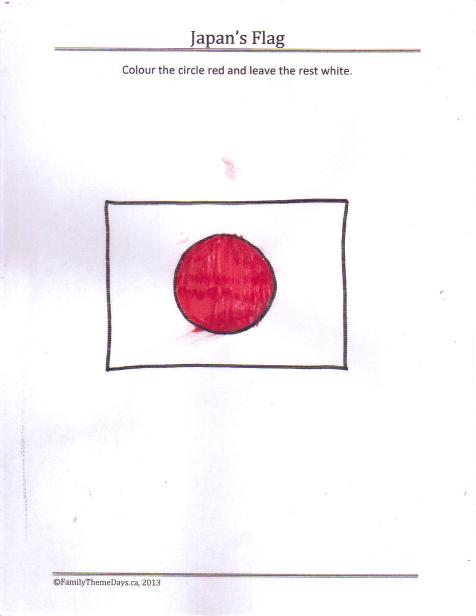
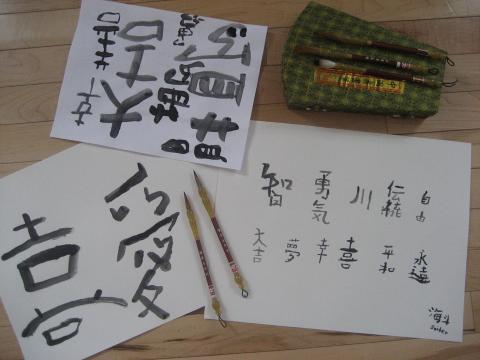
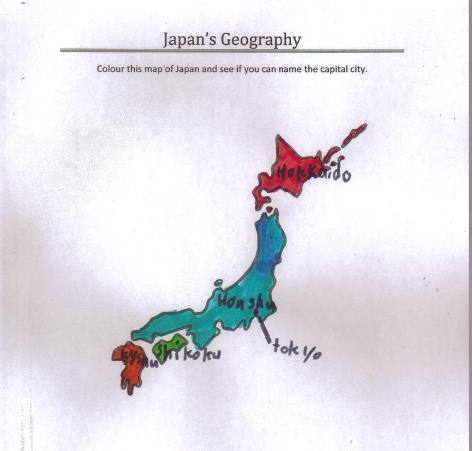
LEARNING ACTIVITIES: JAPANESE FLAG: Print out a copy of my Japan: Flag Worksheet and have your child colour the circle red. JAPAN’S GEOGRAPHY: Print out a copy of my Japan’s Geography Worksheet and have your child colour it. Then together as a family search an atlas or online for the capital city of Japan. Have your child write the answer on the worksheet. Please excuse any anomalies in the shape of the country or any missing islands or inaccuracies as the worksheet was drawn by me and hence is not perfect. JAPANESE LANGUAGE: Print out my Simple Japanese Words Printable which I compiled using these two websites: http://www.learnalanguage.com/learn-japanese/japanese-phrases/japanese-survival.php http://www.omniglot.com/language/phrases/japanese.php CHART: SHODO/ THE ART OF JAPANESE CALLIGRAPHY: Use black paint diluted with water (as in the craft for ink wash painting above) and have your child try to write some Japanese words. Check online for symbols. If you click here there are a lot for your kids to look at: http://www.japancalligraphy.eu/gallery.htm Have your child pick which words(s) he/she wants to try to draw (or rather paint). We happened to have a proper Japanese brush as we had relatives visit Japan but you can just use a regular brush as well. My eldest liked this feature he found where he could enter his name and it gave a symbol for it in Japanese: http://www.japanese-name-translation.com/site/calligraphy.html
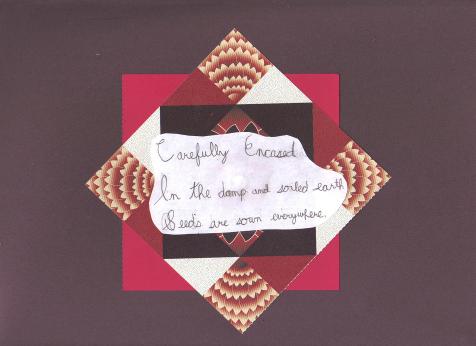
HAIKU: A haiku is a Japanese poem usually about nature with a slight twist ending that follows the syllable count of 5 in the first line, 7 in the second line and 5 in the last line. Encourage your child to write his/her own haiku and perhaps decorate it as my son did. NOTE: For a good picture book that is written in haiku try One Leaf Rides the Wind, by Celeste Davidson Mannis and pictures by Susan Kathleen Hartung, Puffin books, 2002.
WEBSITES: For a tourism site try this one: http://www.japantravelinfo.com/top/index.php If your child loves animal he/she may want to read more about these Japanese animals...macaques or snow monkeys: http://www.blueplanetbiomes.org/japanese_macaque.htm or Akita the national dog: http://animalswecare.com/Pets/Dogs/Akita.php For information about the various forms of Japanese theatre investigate these...noh: http://www.bookmice.net/darkchilde/japan/jnoh.html, or bunraku (puppet theatre) http://www.artelino.com/articles/bunraku.asp and kabuki: http://www.asianartmall.com/kabukiarticle.htm
FOR FUN: GAMES: Jan-Kem-Po: This is just the Japanese version of Rock (Jan), Paper (Kem), Scissors (scissors)
EXTENDED ACTIVITIES: AUDIO VISUAL: Search through your child’s DVD/ video collection (or visit your local library before hand or the Video Store) to find your child’s favourite shows that take place in Japan. For a ninja cartoon try this: · LEGO Ninjago cartoon series.
Try to find this non-fiction title at your local library: · The Little Travellers: Japan, A Little travellers Production, 2007
FIELD TRIP: Go to a Japanese restaurant or a beautiful Japanese garden if you are lucky enough to live near one. |

|
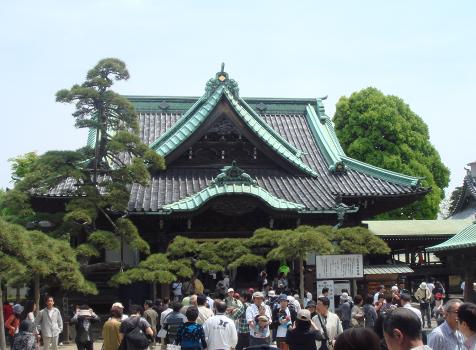
Shibamata, Temple |
|
Photo: C live W |
|
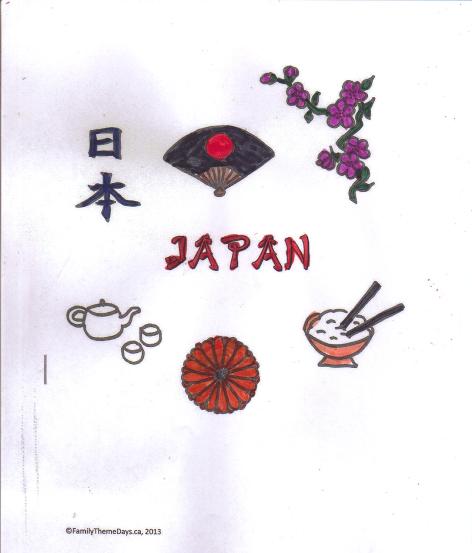
Japan Colouring Page |

|
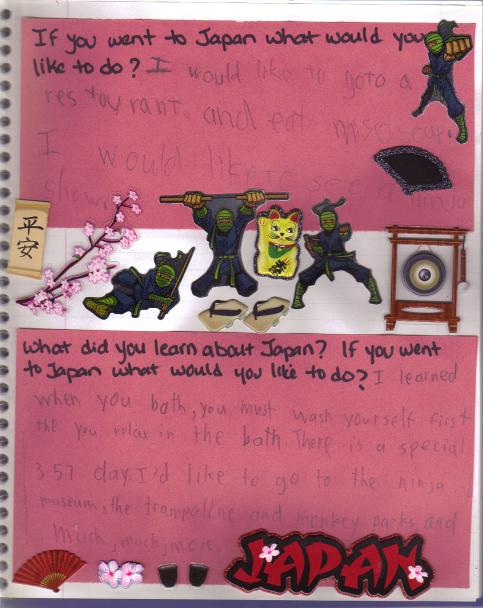
Journaling |

|
Japanese War Fan Craft |

|
Styrofoam Block Printing Ukiyo-e Style |

|
“Ink” Wash Painting—Sumi-e Style |

|
Japanese Carp Paper Wind Sock |

|
|

|
Pop Bottle Cherry Blossom Art |

|
Origami Samurai Hats |

|
Craft Stick Ninja and Geisha |

|
|

|
A Papier-mâché Daruma Doll |

|
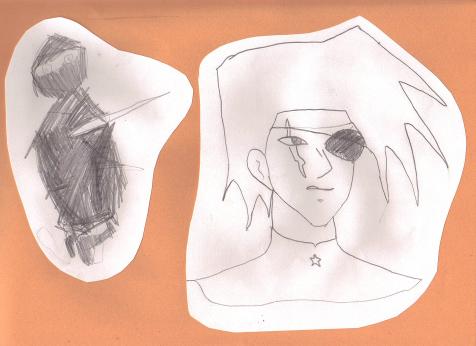
Manga Drawings by my sons (aged 6 and 11) |

|
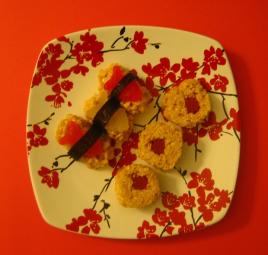
Japanese Inspired Foods |

|
|
|
A Haiku by my son (age 11) |

|
My sons attempt Japanese Calligraphy |

|
Printable Map of Japan to Colour |

|
Printable Flag of Japan to Colour |