|
Dinosaurs View our newly updated Dinosaur Theme Day on our sister site: familythemedays.com!
Dinosaur loving kids will have a roarin’ good time with this Theme Day. This is also the perfect Theme Day to pair with a trip to a museum that features dinosaurs or a dinosaur themed puppet show. We had this Theme Day prior to a vacation to the Alberta Badlands and the excellent Royal Tyrrell Museum in Drumheller. Print out the Family Theme Day Planner and decide which activities you’d like to do and in what order.
SONGS: For a fun dino song listen to “Walk the Dinosaur”, by Was Not Was. It will leave your family stomping around the living room singing “Boom Boom Acka Lacka Lacka Boom”!
SCRAPBOOK ACTIVITIES: COLORING PAGES: You can find many free colouring pages online by using your favourite search engine and typing in Dinosaur Colouring Pages or print out my Dinosaurs Colouring Page.
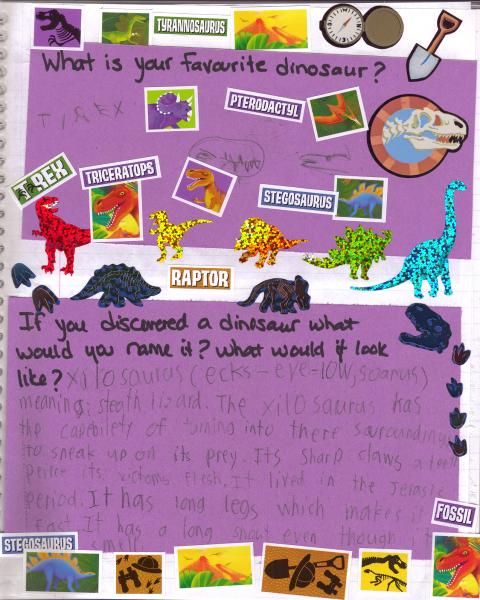
JOURNALING QUESTION PROMPT: Write out one or more of the following questions in your Family Theme Day Scrapbook or on a piece of paper to glue in your scrapbook: How many different dinosaurs can you name? What is your favourite dinosaur? Draw a picture of your favourite dinosaur. If you discovered a dinosaur what would you name it? What would this new dinosaur look like?
Choose the level of your child: ¨ Toddler – discuss the answer(s) out loud first and have your child draw a picture of the answer ¨ Preschooler/Kindergartener – discuss the answer(s) out loud first and write the answer down for him/her leaving one word for him/her to write out himself/herself with your help. You could also encourage him/her to draw a picture as well. ¨ Early Grade School – have your child either write out the answer himself/herself (encourage phonetic spelling) without your help, or offer to help with spelling each word out loud one word at a time. ¨ Grade School – have your child write a sentence or two on his/her own and then read over and discuss the response. (You decide whether to correct the spelling or not) ¨ Older Child – have your child write a longer response (paragraph). ¨ As A Challenge – instead of a question ask your older child to write a story or poem about dinosaurs. PUZZLES: Print out a Dinosaur Word Search: Easy Dinosaur Word Search or Difficult Dinosaur Word Search. Check here for the answer keys: Easy Dinosaur Word Search Key or Difficult Dinosaur Word Search Key.
BOOKS: Raid your child’s bookshelves to find any books with dinosaurs in them. OR Go to the library with your child to find some books about dinosaurs. There are always huge amounts of dinosaur books for kids and your library may even have a separate section devoted to them! OR Go to the library on your own to find books featuring dinosaurs from both fiction and nonfiction to have already on hand for your theme day. Many libraries allow you to go online and search for titles based on subject. Reserve them if you can to save time.
Here are some nonfiction/learning titles about Dinosaurs:
· Don’t Know Much About: Dinosaurs, by Kenneth C. Davis and illustrated by Pedro Martin, HarperCollins Publishers, 2004—This one offers a decent amount of information and uses cartoon illustrations of dinosaurs throughout. · Dinosaur Discovery: everything You Need to be a Paleontologist, by Chris McGowan and illustrated by Erica Lyn Schmidt, Simon & Schuster Books for Young Readers, 2011—this is a neat book and would be perfect if you have older kids who are really scientific and interested in experiments as if offers some great activities that are more academic than what I offer on this Theme Day page. · From the Dinosaurs of the Past to the Birds of the Present, by Marianne Johnston, PowerKids Press, 2000—This book offers fairly easy text and basic information about dinosaurs. · The Ultimate Dino-Pedia (National Geographic Kids), by “Dino” Don Lessem and illustrated by Franco Tempesta, National Geographic, 2010—This is a fantastic (and large) book with great illustrations of many plant and meat eaters. We found it very useful to refer to this book when filling out my Dinosaur Timeline Worksheet (Learning Activity Below). · What Are Dinosaurs?, by Bobbie Kalman, Crabtree Publishing Company, 2011—This is the perfect book for new readers as the text is large and it offers just basic dino information. · What Did Dinosaurs Eat? And Other Things You Want to Know About Dinosaurs, written by Elizabeth MacLeod and illustrated by Gordon Sauvé, kids Can Press, 2001—This book answers 14 questions that kids may have about dinosaurs and offers basic information making it not as daunting as some more scientific dinosaur books out there. Here are some picture book about Dinosaurs: · Crunch Munch Dinosaur Lunch, by Paul Bright and illustrated by Michael Terry, Good Books, 20120—This is a sweet story of Teri the tiny T-Rex who adores her BIG brother Ty a little too much as he finds her very annoying. Lovely story of siblings! · Dancing with the Dinosaurs, written by Jane Clarke and illustrated by Lee Wildish, Imagine Publishing, 2012—This brightly illustrated book offers a fun rhyme about dancing dinosaurs! · D is for Dinosaur: A Prehistoric Alphabet, by Todd Chapman and Lita Judge and illustrated by Lita Judge, Sleeping Bear Press, 2007—Each letter of the alphabet has it’s own dino related rhyme and each page has facts that would appeal to older kids beside the illustrations. · Dinosaurs Galore!, by Giles Andreae and illustrated by David Wojtowycz, Tiger Tales, 2004—This brightly illustrated book offers fun rhymes introducing different types of dinosaurs. · Harry and the Bucketful of Dinosaurs, by Ian Whybrow and illustrated by Adrian Reynolds, Puffin Books, 2003—Harry has a bucket of toy dinosaurs that are alive for him! This is a cute series of books. · How do Dinosaurs Eat Their Food?, by Jane Yolen and Mark Teague, The Blue Sky Press, 2005—There are many books in this series including How do Dinosuars say Goodnight , How do Dinosaurs say Happy Birthday and How do Dinosaurs Play All Day, but this one looks at table manners with great humour. · How the Dinosaur Got to the Museum, by Jessie Hartland, Blue Apple Books, 2011— This is a fun picture book that adapts the “House that Jack Built” idea of repeating words to teach readers about how dinosaurs get to museums via paleontologist, dinosaur hunter, excavator, mover, preparators, curator... · Katie and the Dinosaurs, by James Mayhew, Orchard Books, 2004—Katie and her grandmother visit the Natural museum when she gets lost and discovers a room where the dinosaurs are alive. She journeys through the land of the dinosaurs to help a little Hadrosaurus find his parents . This is another book in Mayhew’s Katie series where the little girl ventures inside different paintings in museums. · The Magic school Bus In the Time of the Dinosaurs, by Joanna Cole and illustrated by Bruce Degen, scholastic Inc., 1994—Ms. Frizzle takes her calss on an amazing journey back in time where they learn about dinosaurs. · Stomp, Dinosaur, Stomp!, by Margaret Mayo and illustrated by Alex Ayliffe, Walker & Company, 2010—Using cut-paper collage for illustrations this bright and fun book uses actions to describe each dinosaur and might encourage your preschooler to stomp, stomp, stomp around your house as well!
CRAFTS: STICKER COLLAGE: Materials: Various stickers of dinosaurs, coloured paper, markers and/or crayons (Optional). Step 1: Let your child pick the colour of paper he/she wants to use for this craft. Step 2: Give your child the stickers and let him/her either make a scene using the stickers or create a collage by overlapping the stickers. Step 3: If your child so desires have him/her add details or embellishments to the scene.
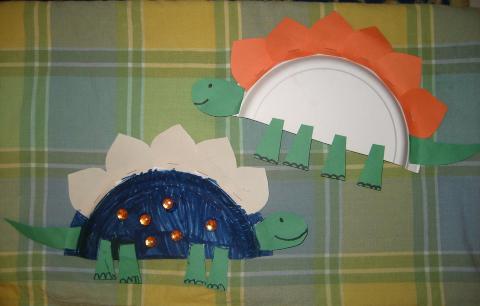
STEGOSAURUS PAPER PLATE:
Materials: Paper plate, coloured paper, markers or crayons, child-safe scissors, stapler, glue stick, sequins or craft gems for further decoration and white glue (Optional).
Step 1: Cut a paper plate in half (you can now make 2 Stegosaurus crafts) and if your child wants he/she may colour it with crayons or markers. Step 2: Have your child pick out the colour of paper he/she wishes to use for the Stegosaurus’ back plates and for the head, tail and legs. Step 3: I then folded the paper for the back plates five times and then cut out a simple shape for the plates (you can make the shape more rounded or more tear drop as well). By folding the paper I was able to make five identical back plates. Help your child staple the back plates to the rim of the paper plate. Step 4: Cut out a simple tail shape and a head for the dinosaur and have your child draw a face on the head. Either staple or glue these pieces to the paper plate (we glued them). Step 5: Cut out angled rectangular shaped legs and have your child draw toes on them. Then have your child glue the legs onto the paper plate. Step 6: If your child desires, let him/her decorate the Stegosaurus further by adding sequins or craft jewels with white glue. Step 7: Allow the craft to draw and then display or play with it!
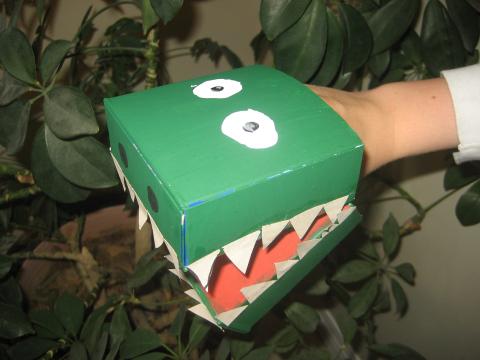
T-REX MACARONI BOX PUPPET:
Materials: One empty macaroni and cheese box, sharp scissors (for adult use), paint and paint brushes (we used acrylic paints), newspaper to cover the work space, a jar of water and paper towels, a paint pallet or a piece of waxed paper to put the paint on, old clothes or an art smock to protect clothing while painting, child safe scissors, white paper for the teeth., glue stick.
Step 1: (Parent step) Using the sharp scissors start to cut width wise along the middle of the box along three sides, leaving one side uncut. Carefully fold the box over towards the uncut side. You now should be able to fit your hand in the box and open and close the box like it is a mouth. Step 2: Get all the paint stuff ready and have your child choose the colour for the dinosaur. Step 3: Paint the box the base colour. My eldest son decided to hold the box in his left hand (keeping the mouth open) whilst painting with his right and then seemed to work very well. The box will require two coats of paint to cover the product information. Step 4: You may need to set it down on waxed paper to dry but we had a hot day so the box dried quickly while my son held it so we didn’t need to do that. Step 5: Next, colour the inside of the mouth (the part that folds and touches) red. Step 6: Paint eyes and nostrils as well. Step 7: Once the box is dried cut out triangular teeth from the white paper and glue them to the box. Step 8: Have fun!
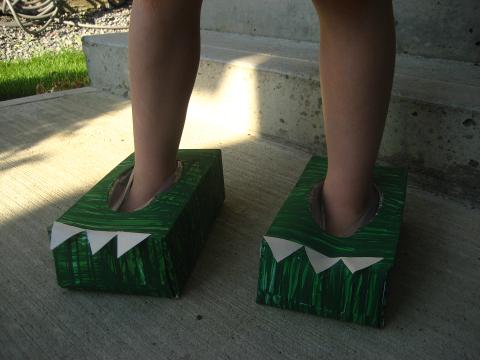
DINOSAUR FEET: Materials: Two rectangular shaped tissue boxes, paint and paint brushes (we used acrylic paints), newspaper to cover the work space, a jar of water and paper towels, a paint pallet or a piece of waxed paper to put the paint on, old clothes or an art smock to protect clothing while painting, child safe scissors, coloured paper for the claws, glue stick.
Step 1: Have your child paint the top and four sides of the tissue box the colour of his/her choice. There is no need to paint the bottom of this craft. If you do not want to see the tissue box’s packaged design underneath the paint you may need to paint two coats. We liked the look of the stripes underneath our green paint so decided to only paint one coat to the boxes. Step 2: When the boxes are dry cut out triangular claws from the coloured paper and have your child glue them to the boxes. Step 3: Once dried, your child can where these dinosaur feet like slippers. Let your child stomp around the house like a fierce dinosaur! My 6 year old loved this part!
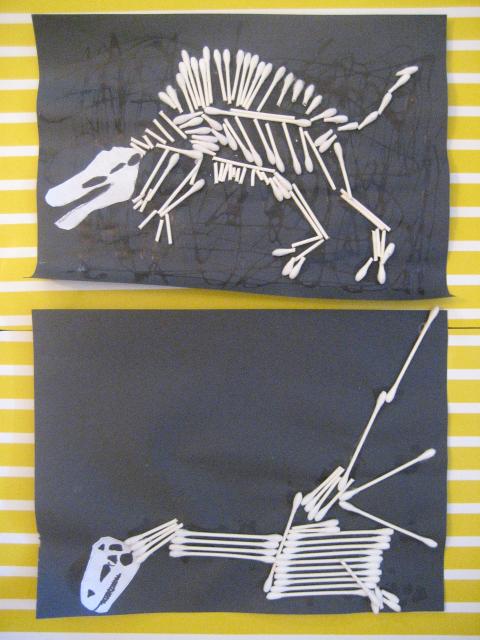
DINOSAUR BONES PICTURE:
Materials: Q-tips, white glue, waxed paper, black paper, sharp scissors (parent use only), a picture of a dinosaur skeleton (optional), white paper, child-safe scissors, a pencil, a black marker. Step 1: Have your child choose the type of dinosaur he/she would like to make. My youngest chose a T-Rex and my eldest a Spinosaurus. Have your child draw the skull (or help him/her by drawing it yourself) and then trace it in black marker and cut it out. Step 2: (Parent step) leave some Q-tips whole, but cut some in half and cut some at the tip to make differing sizes to represent the bones. This was more difficult than I thought it would be and I discovered that if was easier to cut if I bent the Q-tip first. Watch out sometimes the pieces fly away when you are cutting them!! Step 3: My children both wanted to look at a picture to make their dinosaurs. My eldest went so far as to trace his basic shape onto white paper and then lay out the Q-tips. My youngest just made his up as he went along and didn’t plan his at all. Just give your children white glue and the Q-tips and have them either dip and press to the page or apply the glue from the bottle to the black page and then press the Q-tips onto the glue. Step 4: Have your child glue the skull to the picture as well. Step 5: Let the picture dry and then display!
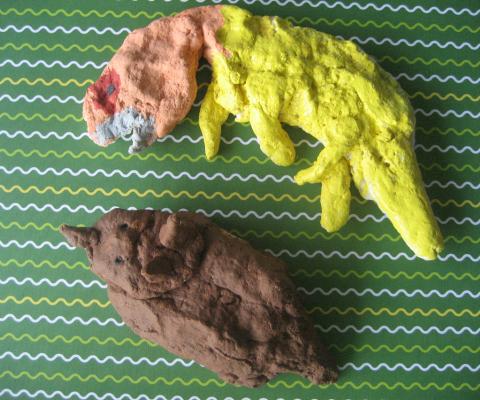
DINOSAUR CLAY FIGURES:
Materials: Basic salt dough (I found my recipe on Pinterest from: http://www.busybeekidscrafts.com/Salt-Dough-Recipe.html and found that it worked very well), acrylic paint, paint brushes, newspaper to cover the work space, a jar of water and paper towels, a paint pallet or a piece of waxed paper to put the paint on, old clothes or an art smock to protect clothing while painting.
NOTE: This craft takes more than one day to make as the dough needs to dry. We didn’t use the oven to dry the dough but I wish we had tried that as it took many days to dry our pieces and we had to turn them over to dry the underside.
Step 1: Make your basic salt dough (1 cup of salt, 2 cups of flour and 1 cup of warm water) and let your child create his/her very own dinosaur. Step 2: Let the dough either air dry or bake at 200F until it is dry. Step 3: Give your child the paints and brushes and let him/her colour the dinosaur.
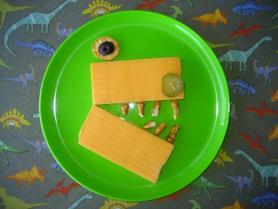
FOOD: SNACK: T-REX CHEESE SNACK: Ingredients: Cheddar cheese, pretzels, circle crackers, small dill pickles, olives (or substitute your child’s favourite dried fruits or fresh veggies). Step 1: Cut two rectangles from the cheese and place them on your child’s plate like an open mouth. Step 2: Set a small round cracker above one of the cheese slices as an eye and dot it with a piece of cut olive. Step 3: Use a small slice of dill pickle as the nostril and set it at the tip of the top cheese slice. Step 4: Break apart pretzel pieces to create the teeth and set them inside the mouth shape. Step 5: Serve to your child!
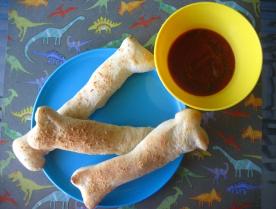
LUNCH: BREADSTICK BONES: Ingredients: Refrigerated pizza dough, parmesan cheese, (Optional for a dipping sauce) a can of tomato sauce, dried or fresh herbs, garlic powder.
Step 1: Take the dough out of the can and spread it out on a lightly floured surface. Take a knife (parent step) and cut out strips of the dough. Step 2: Shape the strips’ ends to look like bones and place on a lightly greased baking sheet. Step 3: Sprinkle with parmesan cheese and bake for about 13 minutes or until the breadsticks are lightly browned and ready to eat. Step 4: (Optional but highly recommended) Make a simple dipping sauce by heating a small can of tomato sauce in a saucepan with about 1 tsp (or to taste) of garlic powder and some fresh chopped herbs or dried Italian herbs. Step 5: Serve the bones with or without the tomato sauce for dipping! Yum!
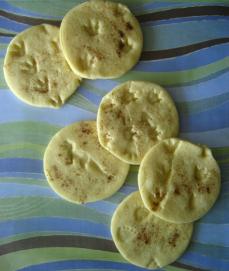
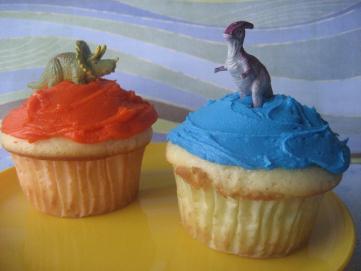
DESSERT: DINOSAUR TRACK COOKIES: Make some sugar cookie dough (I used Marian Keye’s recipe from her Saved By Cake book) in advance to this Theme Day (usually sugar dough needs to sit in the fridge for 1 hour prior to using). Once the dough is ready, roll it out on a lightly floured surface and use a circle cookie cutter or a clean soup can to make circle cookies! Pre-clean some plastic dinosaur toys from your kids’ collection and have your kids press the feet into a bowl of flour and then press them onto the circle cookies! Let your children have fun making dinosaur prints all over the cookies to create a fossil like impression! Lightly, sprinkle with cinnamon before baking to give them a more earthy look! DINOSAUR TOPPED CUPCAKES: Make your favourite cupcakes (we happened to have some un-iced ones in the freezer which I pulled out for this idea. The cupcakes are from this recipe—http://www.canadianliving.com/food/easy_vanilla_cupcakes.php—without the optional vanilla bean) and frost with your favourite icing. Then set pre-cleaned plastic dinosaur toys on top for an easy decorating idea.
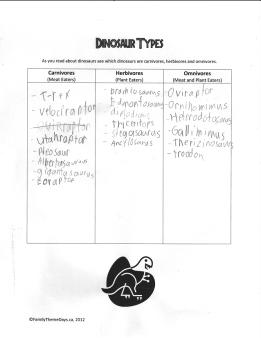
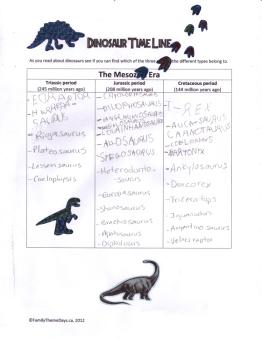
LEARNING ACTIVITIES: PRINTABLE CHARTS: CLASSIFYING DINOSAURS: Print out a copy of my Dinosaur Types: Carnivore/Herbivore/Omnivore Worksheet and together as a family, as you read books about dinosaurs categorize the dinosaurs according to what they eat: meat, plants or both. DINOSAUR TIMELINE: Print out a copy of my Dinosaur Time Line Worksheet and as you read about dinosaurs in your non-fiction books from the library or from home fill the chart out to see which period of the Mesozoic Era: Triassic, Jurassic and Cretaceous.
PALEONTOLOGIST FUN: NOTE: Most dino-loving kids already know what a Paleontologist is, but in case your child is new to the term now is the perfect time to teach them. Check here for info on Paleontology, the study of prehistoric life: http://en.wikipedia.org/wiki/Paleontology
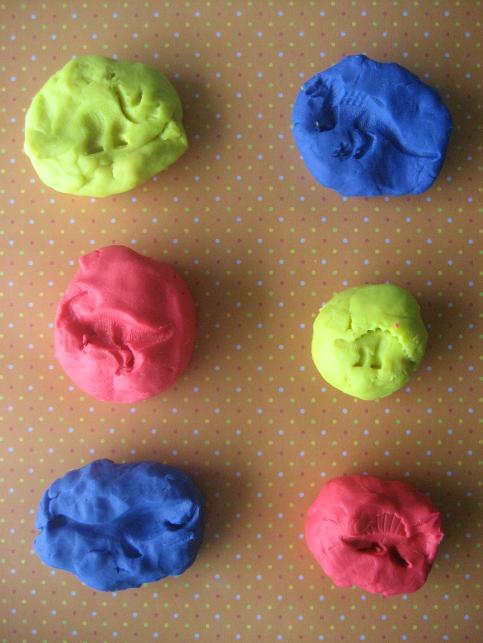
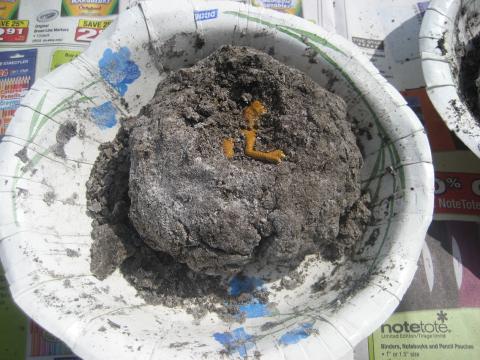
FOSSIL CAST: NOTE: Paleontologists often find fossils which are preserved remains or organisms. Check here for more information: http://en.wikipedia.org/wiki/Fossil. Many fossils are imprints of prehistoric organisms. To give your child an idea of what a fossil might look like try this easy activity. Use play dough or air drying craft clay from a craft store for this craft (we had originally tried a homemade baking soda clay but the end result was brutal as the clay cracked as it dried so we re-tried this craft using play dough). Give your child some small dinosaur toys or shells if you have some and a rolled ball of dough. Have your child press the toy or shell into the dough and then carefully lift it up to see the impression left in the dough. Fossils are hard rock like pieces of imprints of dinosaur skin, shells, plants, even footprints etc.. VARIATION: You could turn this into a game by playing match the dinosaur toy to the imprint! CLAY DIG: NOTE: Paleontologists often uncover fossilized bones during an excavation and not just an imprinted fossil. For more inforatmion on archeological excavations check here: http://en.wikipedia.org/wiki/Excavation_%28archaeology%29 Let your child become a Paleontologist on a dig by creating his/her own clay dig. This requires some preparation before the day of your Theme Day. Materials: Plastic dinosaur toys, paper bowl, 1 cup of dirt, 1 cup of flour, 1/2 cup of salt, 1/2 cup (more or less) of water. · Step 1: This is messy but your kids will love it! In each paper bowl (for each child) mix 1 cup of dirt, 1 cup of flour and /12 cup of salt. · Step 2: Once these three ingredients are mixed together add some water a little bit at a time. I didn’t properly measure the water so I cannot recall how much I used. I basically just added a little water at a time and mixed the dirt dough together until it started to form a ball. · Step 3: Hide a dinosaur toy in the ball of dirt and remould the mixture to cover the toy. Set the dirt ball back into the paper bowl and let it dry. · Step 4: I am not sure about how long this takes to dry as I made it prior to our dinosaur vacation and then when we returned we ended the Theme Weekend with this activity. Just keep feeling it until it is rock hard! · Step 5: Give the bowl or (simply take out the mud rock) to your child. Make sure your child is doing this activity outside and that the work area (we used our driveway) is covered in newspapers for easy clean up! · Step 6: Give your child a screwdriver (parental guidance is required here as well as parental choice—you know your child...can he/she handle a tool without hurting himself/herself). Watch your child as he/she digs away at the mud rock until a dinosaur is discovered! · Step 7: Once the dino is removed you may even find some fossilized imprints in the mud rock!
WEBSITE: This website is great for kids and offers games and lots of information: http://www.kidsdinos.com/ There is a lot of good information about dinosaurs on this site: http://dsc.discovery.com/dinosaurs/ For some dino info and a fun quiz that reveals what dinosaur you are try here: http://www.nhm.ac.uk/kids-only/dinosaurs/index.html
FOR FUN: GAMES: LET’s PRETEND: Encourage your child to move like the different dinosaurs you have read about. You could even play charades (I hope to make a dinosaur charades printable soon!) DINOSAUR TOYS: If your child has some plastic dinosaur toys today would be a great day to play with them together. Try using wooden blocks and some blankets to create a wondrous dinosaur world for the toys! JOKES: Q: What do you call a blind dinosaur?
Q: What do you call it when dinosaurs crash their cars? A: Tyrannosaurus Wrecks!
Q: what do you get when you cross a dinosaur and fireworks! A: Dino-mite!
Q: What do you call it when a dinosaur makes a goal in soccer? A: A dino-score!
Q: What do dinosaurs like on their pancakes? A: Try-Syrup-Tops!
EXTENDED ACTIVITIES: AUDIO VISUAL: Search through your child’s DVD/ video collection (or visit your local library before hand or the Video Store) to find your child’s favourite shows with dinosaurs in them. For young children try these titles: · Any of the Harry and the Bucketful of Dinosaurs series · Any of the Dinosaur Train Series · Go Diego Go!: The Great Dinosaur Rescue · Sesame Street: Dinosaurs! · Wonder Pets: Save the Dinosaur! Here are some Dinosaur Movies: · Dinosaur, Disney movie with digital animation that looks realistic. · Any of the Land Before Time Series (warning: The original movie has a pretty sad moment—think Bambi—so you may want to pass on that one, but the others in the series are just fine). · Scooby-Doo! Legend of the Phantosaur
Try to find this non-fiction title at your local library: · Bill Nye the Science Guy: Dinosaurs, Disney Educational Productions
FIELD TRIP: If you live near a museum that highlights dinosaurs go there for a field trip. If you are lucky enough to live in a region that has many dinosaur digs see if you can arrange a fossil Hunt for your kids. This is usually done through the nearest museum. We were able to go on a guided hike and participate in fossil prospecting (which means we could find and gather fossils, then show them to our guide and fellow hikers, and then we had to put them back). Our kids were also able to participate in fossil casting through the museum as well.
PUPPETS: There are many great travelling shows that have terrific dinosaur puppets. Here are two we have seen over the years: · Walking with Dinosaurs—http://www.dinosaurlive.com/ · Dinosaur Petting Zoo (by Erth Physical and Visual Theatre) - http://erth.com.au/
|

|
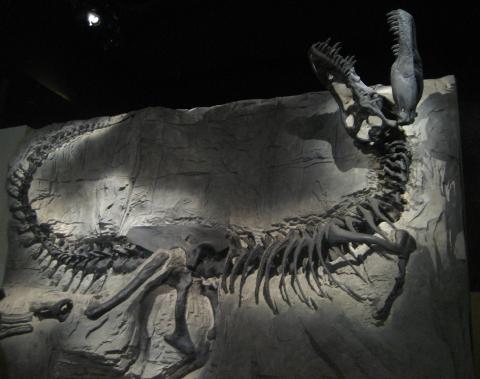
Terrific T-Rex Drumheller, Alberta, Canada |
|
Photo: C Wright |
|
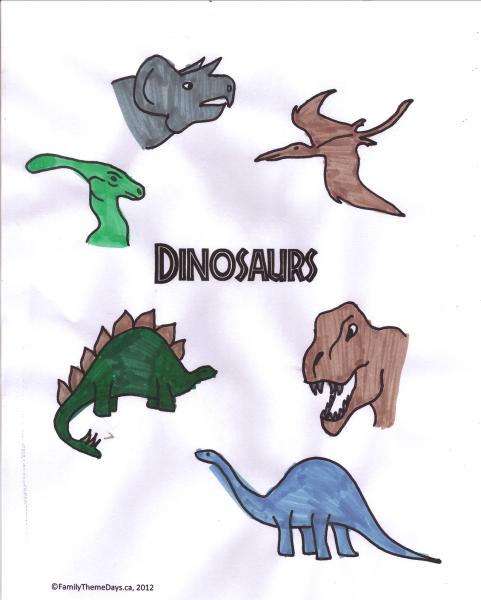
Dinosaurs Coloring Page |
|
Journaling |
|
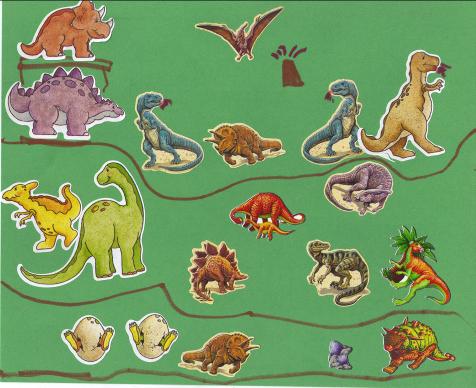
Dinosaur Sticker Scene |
|
Stegosaurus Paper Plate Craft |
|
T-Rex Macaroni Box Puppet |
|
Dinosaur Feet |
|
Dinosaur Inspired Food |
|
Dinosaur Learning Printables |
|
Dinosaur Clay Dig |
|
Dinosaur Bones Pictures |
|
“Fossil” Imprints |
|
|
|
Salt Dough Dinosaur Sculptures |
|
|
|
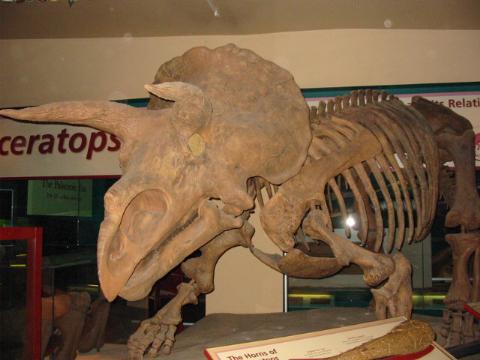
Triceratops Washington DC |