|
Camping I made this Theme Day as a way to prepare for my boys’ first Father/Son Camp Out! I had originally planned the Theme Day as a winter project for something different to do on those chilly days when we didn’t want to go outside but decided to do it in the late Spring just before the camping trip instead. So as you can see, this Theme Day can be used any time of year, not just camping season, and can be used to prepare for an actual Family Camping Trip but can also be just as fun as a rainy/snowy day activity (make your own indoor tent using chairs and blanket!). Print out the Family Theme Day Planner and decide which activities you’d like to do and in what order.
SONGS: When I was a Girl Guide (many moons ago) we sang a lot of camp songs around the camp fire. Here are some of my favourites: · Bear song · Jay Bird (also called Bluejay on the link below under silly songs) · C-H-I-C-K-E-N · Old Lady Leary For a great site with lots of camp songs (including the ones I mentioned above) try here: http://www.ultimatecampresource.com/site/camp-activities/camp-songs.html
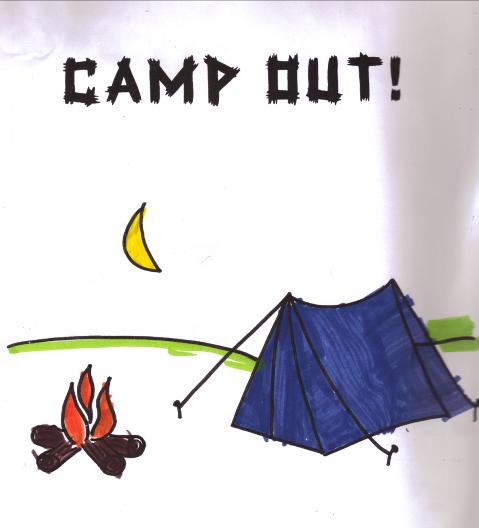
SCRAPBOOK ACTIVITIES: COLORING PAGES: You can find many free colouring pages online by using your favourite search engine and typing i “Camping coloring Pages” or print out my Camp Out Colouring Page.
JOURNALING QUESTION PROMPT: Write out one or more of the following questions in your Family Theme Day Scrapbook or on a piece of paper to glue in your scrapbook: What do you like about camping? Write about your best camping trip. Would you like to go camping? What do you think would be the best part of camping? If you could go camping where would you like to go and what would you like to do? Choose the level of your child: ¨ Toddler – discuss the answer(s) out loud first and have your child draw a picture of the answer ¨ Preschooler/Kindergartener – discuss the answer(s) out loud first and write the answer down for him/her leaving one word for him/her to write out himself/herself with your help. You could also encourage him/her to draw a picture as well. ¨ Early Grade School – have your child either write out the answer himself/herself (encourage phonetic spelling) without your help, or offer to help with spelling each word out loud one word at a time. ¨ Grade School – have your child write a sentence or two on his/her own and then read over and discuss the response. (You decide whether to correct the spelling or not) ¨ Older Child – have your child write a longer response (paragraph). ¨ As A Challenge – instead of a question ask your older child to write a story or poem about camping. PUZZLES: Print out a Camping Word Search: Easy Camping Word Search or Difficult Camping Word Search. Check here for the answer keys: Easy Camping Word Search Key or Difficult Camping Word Search Key.
BOOKS: Raid your child’s bookshelves to find any books about camping. OR Go to the library with your child to find some books about camping. OR Go to the library on your own to find books about camping from both fiction and nonfiction to have already on hand for your theme day. Many libraries allow you to go online and search for titles based on subject. Reserve them if you can to save time.
Try to find some of these nonfiction/learning titles:
Adventures Outdoors: Let’s Go Camping, by Suzanne Slade, PowerKiDS Press, 2007—With bigger text this is a good one for early readers and offers simple insight into camping.
Camp Out! The Ultimate Kid’s Guide, by Lynn Brunelle and illustrations by Brian Biggs and technical illustrations by Elara Tanguy, Workman Publishing, 2007—This is a fabulous book as it covers many aspects of camping from planning, setting up camp and camping skills, but also offers activities about weather watching, experiments, outdoor crafts, and campout games.
Cooking in a Can: More Campfire Recipes of Kids, by Katherine L. White and illustrated by Debra Spina Dixon, Gibbs Smith, Publisher, 2006—This thin guide offers recipes and different ways to cook while camping. I cannot vouch for any of the recipes as I have not tried them but there were some interesting ways to cook (i.e.. Solar oven, hot rock and of course cooking in a can).
The Down and Dirty guide to Camping with Kids: How to plan memorable family adventures & connect kids to nature, by Helen Olsson and illustrations by Scotty Reifsnyder, Roost Book, 2012—this is set up more of parents than kids but it is a useful book worth including.
Follow the Trail: A Young Person’s Guide to the Great Outdoors, by Jessica Loy, Henry Holt and Company, 2003 – This book explores all the steps and fun of camping starting with the planning of a camping trip but it also looks at hiking and wildflowers and animals that might be discovered on such a trip and includes tracks and bird calls etc.. This is a great book to read before heading on a camping trip.
Hiking and Camping, by Paul Mason, Smart Apple Media, 2007—This is a great nonfiction book for early readers as it offers large pictures and simple but descriptive text about hiking and camping.
Kids Gone Campin’: The Young Camper’s Guide to Having More Fun Outdoors, by Cherie Winner, Creative Publishing International, 2006—This thin guide for kids offers a lot for beginner campers.
Let’s Go Camping, by Jan Mader, Capstone Press, 2007—This is a good book for beginner readers as it offers very little text and has large photographs. There is not much detail but it is perfect for kids who are starting out reading.
The Outdoor Adventure Handbook, by Hugh McManners, Reed Books Canada, 1996—This is a thin and lightweight book which would make it a good one to take with you when you are camping. It offers lots of photographs and labels and of course useful information about what to pack, how to build a shelter and make a fire, as well as activities on how to read a compass and map and tying knots etc.
Here are some picture books:
· Camping, by Nancy Hundal and illustrated by Brian Deines, Fitzhenry & Whiteside, 2002—Beautiful paintings accompany this poetic glimpse of a family and what they experience on their first camping trip.
· Camping Day, by Patricia Lakin and pictures by Scott Nash, Dial Books for Young Readers, 2009—Find out what happens when four silly crocodiles decide to go camping.
· Canoe Days, by Gary Paulsen and illustrated by Ruth Wright Paulsen, Doubleday, 1999 – With simple poetic text and gorgeous paintings this book really captures what it’s like to be in a canoe in the middle of nature.
· S is for S’mores: A Camping Alphabet, written by Helen Foster James and illustrated by Lita Judge, Sleeping Bear Press, 2007 – Each letter has a little rhyme and a gorgeous painted illustration that looks at different aspects of camping from environments to what you’ll see or do or what you’d need to pack, plus each page has additional information about the subject written to give more history or facts.
· Sipping Spiders Through a Straw: Campfire Songs for Monsters, Lyrics by Kelly DiPucchio and pictures by Gris Grimly, Scholastic Press, 2008—My boys loved this book! It is not your typical camping book as it offers ghoulish songs for monsters camping (each to the tune of a familiar song like Take Me Out to the Ball Game or London Bridge is Falling Down).
· When we Go Camping, by Margriet Ruurs and paintings by Andrew Kiss, Tundra Books, 2001—This book highlights a family’s camping trip with gorgeous paintings and at the end of the story offers a bit of a search and find talking about the animals included in each painting.
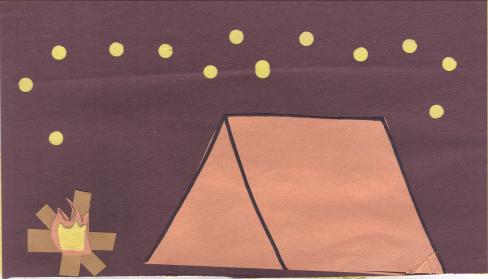
CRAFTS: CAMP AT NIGHT HOLE PUNCH PICTURE:
Materials: Hole punch (single), black paper, yellow paper, orange paper
Step 1: Cut out a rectangle from the black paper. Make sure it is small enough to fit the hole punch so that the top of the page can be covered in holes. Step 2: Show your child how to use the hold punch to create circles at the top of the rectangle. These will be the stars. Step 3: Once the holes have been punched your child can glue the black paper to yellow paper that has been cut to the same size. Step 4: Cut out a simple tent shape and have your child glue it to the page. Step 5: Cut out small and thin rectangular pieces from the brown paper to be the firewood and have your child glue them to the page in a camp fire arrangement. Step 6: Cut out simple flames from the orange and yellow paper and have your child glue these to the brown campfire. Step 7: After it is dry display the art or glue it into your Family Theme Day Scrapbook.
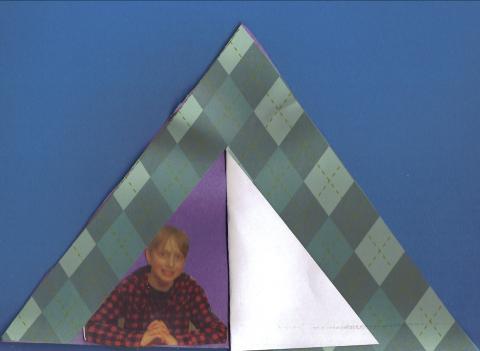
HAPPY CAMPERS FRAME:
NOTE: I was inspired by Pinterest for this craft. The link led to a teaching blog called Thefirstgradeparade.blogspot.com but I couldn’t find the craft or instructions so I made my own version of it.
Materials: Colored paper, patterned paper (like wrapping paper or scrapbook paper), photo or photocopy of a picture of your child, child safe scissors, glue stick, white paper.
Step 1: Have your child pick the patterned paper he/she would like to use as his/her tent. Cut the paper into a large triangle. Step 2: Trace the triangle onto coloured paper (your child’s choice for the background) and cut out that triangle. Step 3: About an inch or so into the patterned paper cut a line parallel to the edge but not all the way to the top. Then carefully fold this over to expose the other side of the patterned paper creating a triangular opening in the tent (triangle). Step 4: Cut your child’s photo out (we printed our pictures from the computer to paper to size correctly) and then arrange behind the patterned paper so that your child’s picture is peaking out of the tent. Glue this into place. Step 5: Finally, glue the patterned tent and photo to the coloured paper. Display or glue into your Family Theme Day Scrapbook.
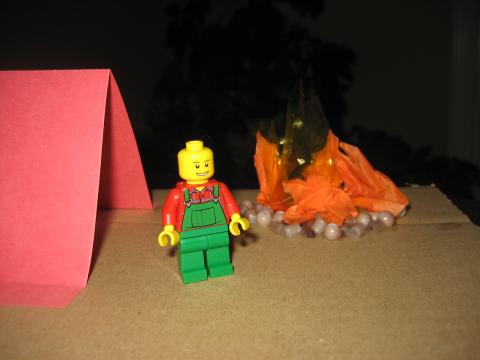
3-D CAMPING SCENE:
Materials: Cardboard, beads, orange and yellow tissue paper, colored paper, child safe scissors, pencil, white glue, glue stick, a pencil with an eraser, damp cloth for sticky fingers.
Step 1: Have your child pick the colour he/she wants for the paper tent. Cut out a rectangle and then fold in half. Make small folds on each end as tabs and glue the tabs to the cardboard using a glue stick. Press and count to ten to make sure it sticks. This is the tent! Step 2: Squeeze white glue into a circle onto the cardboard where your child wants the campfire to go. Have your child set the beads into the glue. This will be the rock circle around the campfire. Make sure you have the damp cloth ready for those sticky fingers. Step 3: Cut squares of paper from the orange and yellow tissue paper and apply glue to the middle of the beaded circle. Crinkle the paper around a pencil eraser and then push into the glue to create flames. Step 4: Your child may want to add paper trees or other embellishments. Let his/her creativity shine! My kids stuck with the two basic ideas. Step 5: Let the scene dry and then your child can play with it using plastic toys.
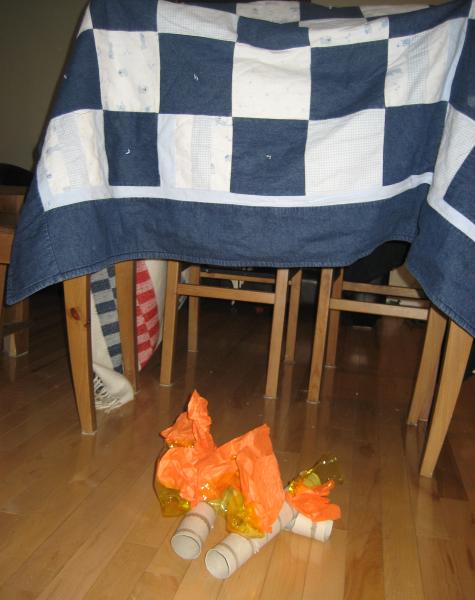
PAPER ROLL CAMPFIRE:
NOTE: this is a good craft to make if you are having an Indoor Camping Theme Day. After you make your indoor tent set up this craft as a pretend camp fire to sings songs around as a family.
Materials: 3 or more paper towel rolls (we used three), yellow and orange tissue paper, (Optional) brown paint.
Step 1: Decide how you will place your empty paper towel rolls and then cut a hole into one or more (we only used one) that will fit the other paper rolls. Step 2: (Optional) you can have your child paint the rolls to look more like wood using brown paint but as you can see from the photo we opted not to paint. Step 3: Set the rolls (painted or not) into the holes so they are resting like logs on a fire. Step 4: (Adult step) Poke holes or slits into the paper rolls wherever you’d like flames to be coming out. Step 5: Have your child crunch the tissue paper together and then push the tissue into the slits so that it stays in place but is still rising up like flames. Step 6: Place your faux fire outside a makeshift indoor tent (we made ours using blankets and chairs) and sit around your fire to tell stories, read books, or eat marshmallows (or microwaved S’mores from the recipe below).
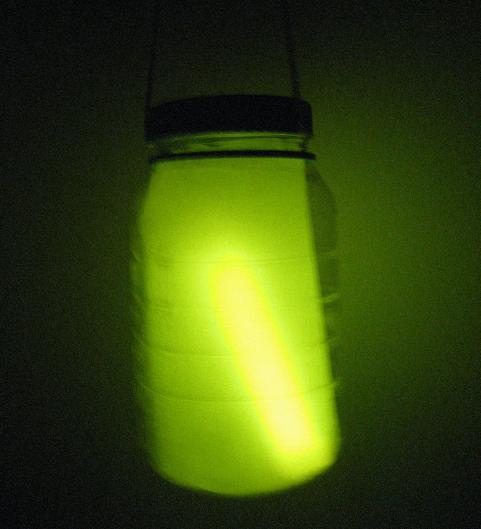
FAKE LANTERN JAR:
Materials: Empty and cleaned plastic mayo jar (or other such jar) and its lid, glow stick (we bought ours from the Dollar Store), thin string or yarn, child safe scissors, waxed paper or parchment paper, packing tape.
Step 1: Cut out a piece of waxed paper that will fit inside the jar. Roll it to fit in the jar encircling it. Step 2: Cut out a piece of string or yarn to be the handle of the lantern. Choose the length to suit your child. Step 3: Turn the lid of the jar over and tape each end of the string to it. You should still be able to screw the lid on. Step 4: When you want to use the lantern crack the glow stick to activate it and insert it into the jar. Screw the lid on and now your child can carry it or you can hang it from a tree etc. to see it shine!
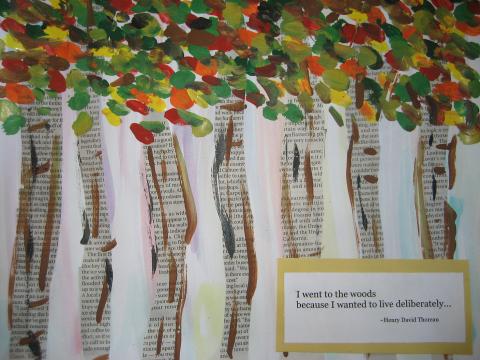
NATURE POSTER:
NOTE: Part of camping is enjoying the great outdoors and appreciating the beauty of nature. I thought this poster/artwork could represent that by including a beautiful saying about nature. I had originally thought the saying should just be “Take only pictures, leave only footprints” to teach my kids about respecting nature and leaving things as they are, but there are so many poets and writers who have philosophised about nature I was inspired to make a printable of Nature Quotes which would also work and as you can tell from the photo we opted to use a different saying.
Materials: A piece of white construction paper (size of your choosing), old newspapers, child safe scissors, glue stick, water colour paint, other paint (tempura or acrylic etc.), paint brushes, paper or plastic to cover and protect your table, a container of water for the paint, wax paper or a paint palate, old clothes or an art smock to cover yourself and your child, coloured paper, (Optional) print out a copy of my Nature Quotes Printable and choose a nature saying as a family to include on the picture (you can have your child write it out or else type it on the computer and print it and glue it to nice coloured paper).
Step 1: Have your child use the watercolours to give the paper (which will be the background of the picture) a wash (basically a watery paintbrush and a bit of colour). Your child can choose one colour or many colours. Have your child brush the paint in lines or swift strokes or watery paint. The page should be lightly coloured when finished and still have white paper showing. Step 2: Let the watercoloured background dry. This won’t take long. Step 3: Help your child to cut out long strips of newspaper words to make the tree trunks. Step 4: Have your child glue the strips to the painted background using the glue stick. Step 5: Squirt different leaf colours or paint onto your palate or piece of waxed paper (or just open the jars of paint if that is the type of paint you have) and have your child then apply dots or quick swooshes of paint to the top of the page and along the newspaper trunks to be the leaves. We choose autumn colours and even added some brown lines along the newspaper to make it more like bark. Step 6: (Optional) Once the paint is dry you could glue a nature quotation or poem or saying to the art. We typed ours on the computer and then printed it out, cut it out and glued it to a strip of coloured paper). You can choose your own favourite saying or use one of the quotes included on the printable.
FOOD:
SNACKS:
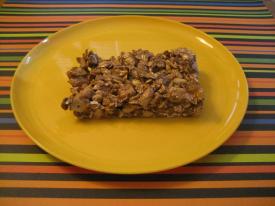
Granola Bars: Use your favourite recipe or search online. I tried Marion Keyes’ recipe from her cookbook “Saved by Cake” and loved the use of condensed milk instead of corn syrup in the recipe to combine the oats, nuts and seeds!
Trail Mix:
NOTE: This recipe calls for nuts, but you could also make it replacing the nuts with more mixed cereal.
Ingredients: 3 cups of nuts (peanuts, almonds, pecans, cashews for instance) , ½ cup sunflower seeds, ½ cup raisins, ½ cup dried cranberries, ½ cup dried cherries (if you can find them...I never seem to be able to), 1 cup of chopped dried apricot, 1 cup of chocolate chips or less, (Optional) 1 cup of mixed cereal (like Cheerios).
NOTE: You can add other goodies like marshmallows or M&Ms or Reese’ Pieces if you want as well.
Step 1: Mix all the ingredients together in a large bowl. Step 2: You can either then make smaller portions by using small resealable bags or use one large one to transport your snack for your camping or hiking trip.
VARIATION:
Step 1: Spread all the ingredients (except chocolate chips) on a baking sheet lined with parchment paper. Step 2: Melt 1 1/2 cups of chocolate chips in a microwave safe container in the microwave (try 30 second intervals and continue to mix before putting back in to melt for another 30 seconds etc. until completely melted) and pour over the mixture or nuts, fruit and cereal. Stir to coat everything. Let chocolate cool then break into pieces and place in re-sealable baggies for each camper.
NOTE: The benefit of the melted chocolate is that it will coat the dried fruit and prompt pickier eaters to eat the fruit. My one picky eater still wouldn’t eat the dried fruit but the other did!
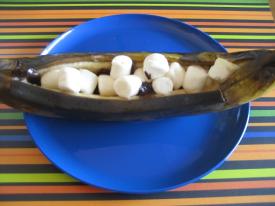
Baked Banana Boats:
NOTE: This can also be made over a campfire but if you are having an indoor camping day try this version. If you are making this over a campfire use two layers of tin foil and cook for about 8 to 10 minutes.
Ingredients per person: tin foil, 1 banana, 1 tbsp of chocolate chips, 3 tsp of mini marshmallows (or less if your banana is small), cooking spray, (Optional) you can add 2 tsp of crushed nuts for a banana sundae like treat or add 2 tsp of crushed graham crackers to make it a s’more-like treat or you can add granola for a more breakfast like taste.
Step 1: Preheat the oven to 400F (200C or gas mark 6). Step 2: Make a slit in each banana lengthwise from top of bottom and then cut two smaller slits widthwise (one near the top of the banana and one near the bottom). This will make opening the banana easier to add in the treats. Step 3: Use a fork to pry open the bananas slightly and then fill each with chocolate chips and marshmallows (plus add-ins like nuts, crushed graham crackers, or granola if desired. Step 4: Lightly spray the foil with non-stick cooking spray and then wrap each banana in the foil making sure there are no openings (or else the melted yumminess will drip out!). Step 5: Place the banana on a baking sheet and bake in the oven for about 10 to 12 minutes. You will know they are ready because the banana will feel soft when squeezed! Step 6: Be careful when opening them. Place on a plate or bowl for your kids and give them a spoon to scoop out the yummy treat. You could also remove the peel completely for little ones and put the contents in a bowl.
LUNCH:
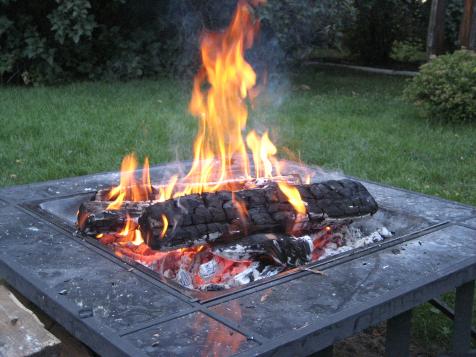
Hot dogs and beans: If you have access to a fire pit (in your backyard or at a park or campground) then roast them with sticks, otherwise cook them on a BBQ or in your oven and don’t forget to make some canned beans as a side dish!
DINNER:
Campfire Cooking—I cannot vouch for any of these recipes as I have not tried them but here are some websites that offer camping dinners:
http://www.free-camping-recipes.com/camping-dinner-recipes.html
http://www.razzledazzlerecipes.com/camping-recipes/tin-foil-dinners.htm
http://www.quietjourney.com/recipes/
DESSERT:
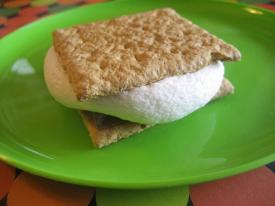
The most classic camping dessert is S’mores of course, but you could also just simply roast marshmallows over an open fire.
If you aren’t planning on camping or cooking near a fire pit try these Indoor S’mores to get the same taste:
Ingredients per person: 2 graham crackers, one piece of milk chocolate bar (broken to fit onto the graham cracker, one marshmallow.
Step 1: Place one graham cracker onto a microwaveable plate. Step 2: Place chocolate onto the graham cracker. Step 3: Set one marshmallow onto the chocolate. Step 4: Microwave for about 10 to 20 seconds (microwaves may vary). Step 5: Set the second graham crackers on top of the marshmallow which should be fluffed up and melty on the inside. Squish the melted loveliness together down to create a sandwich. Step 6: Enjoy this messy treat!
Here are some variations to the classic S’more recipe (I have not made these so cannot comment on them properly, but I like the ideas):
Peachy Caramel S’mores: http://familyfun.go.com/recipes/peachy-caramel-smores-684062/
S’mores Roll-ups: http://familyfun.go.com/recipes/smore-roll-ups-688758/
S’mores in a Bag: http://familyfun.go.com/recipes/smores-in-a-bag-825867/
LEARNING ACTIVITIES:
CAMPING POSTER:
If you have budding artists in your family have your children make either a Camping safety Poster or Fire Safety Poster.
EXPERIMENT:
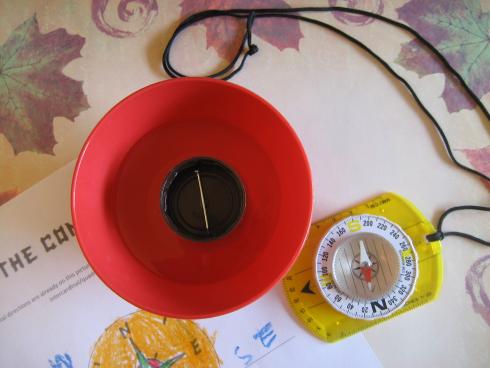
MAKE A COMPASS:
Materials: a plastic bowl of water, a small nail or needle, a magnet, plastic lid that will fit inside and float on the water and still be large enough to hold the nail (a piece of Styrofoam would work as well).
Step 1: Take one end of the magnet, either N or South and stroke the nail with it always going in the same direction and then lift it up and over to start at the same end. Do this for a long time for at least 10 minutes. Your kids will probably be bored at this stage so perhaps you could have the worksheet from the next activity ready for them to do. NOTE: it is very important you use only the ONE end of the magnet (N or S) and that you stroke in the SAME DIRECTION. Step 2: Set the nail into the small plastic juice lid and place the lid to float on the water in the bowl. Let it settle and the nail will point North. To check we set our compass beside the bowl.
HOW TO READ A COMPASS:
NOTE: It helps if you have an actual compass for this to use as a comparison and it would be great to have a map, too.
Print out my “The Compass” Worksheet and have them fill in the directions for North East, North West, South West and South East which are called the intercardinal or quadrantal points. Afterwards discuss how a compass can keep you safe and have your child write an answer on the bottom of the worksheet. You might discuss how a compass can keep you safe because you will always know how to find your way back. It doesn’t matter if it is rainy, or snowy, or foggy or night time, the compass will always point north. Teach your kids that know that no matter where they stand in the world, the compass always points toward the North Pole, due to the magnetic field.
If you have a real compass you can now show them how to read it. Lay the compass flat until the arrow stops spinning. Then turn the red arrow to match it. Show your kids that this is North! If you want to walk south you would have to walk in the opposite direction, etc.. . For a great website on how to read a compass check here: http://www.compassdude.com/compass-reading.shtml
Once you and your kids get the hang of it challenge each other to walk in different directions.
WEBSITE:
This website is a great resource with articles, recipes, crafts, songs, safety etc.: http://www.kidscamping.com/
FOR FUN:
GAMES—CAMPING SCAVENGER HUNT:
If you are going on a camping trip try this scavenger hunt, but even if you aren’t you could take in on a hike at a National park or a local park, or even see what you can find in your neighbourhood.
Print out my Camping Scavenger Hunt Worksheet and have fun working together as a family! If you have a larger group (like you are camping with other families make it a team event). Do not send kids out on their own as they might get lost or hurt. I prefer check list scavenger hunts which means nature is not disturbed. If you are doing this as teams perhaps you could make sure each team as a digital camera and then have the teams take pictures of each item to prove they found everything!
JOKES: KNOCK KNOCK Who’s there? Canoe. Canoe who? Canoe come and camp with me?
Q: What’s green and short and goes camping? A: A boy or girl sprout.
KNOCK KNOCk Who’s there? Wanda. Wanda who? Wanda off while your camping and you’ll get lost.
EXTENDED ACTIVITIES:
AUDIO VISUAL:
Search through your child’s DVD/ video collection (or visit your local library before hand or the Video Store) to find your child’s favourite shows about camping.
· Max and Ruby (one episode is called “Camp Out”)
For a camping movie for older kids try:
· Scooby Doo: Camp Scare.
INDOOR ACTIVITIES:
Indoor blanket Tent: You don’t need summer and camping weather to have a camp out. Make your own camping site inside your house. Make a tent out of blankets, set up with pillows and blankets and books to snuggle and read together.
OUTDOOR ACTIVITIES:
BACKYARD CAMPING: Set up a real tent in your back yard and camp out under the stars in the comfort of your own yard.
FIELD TRIP:
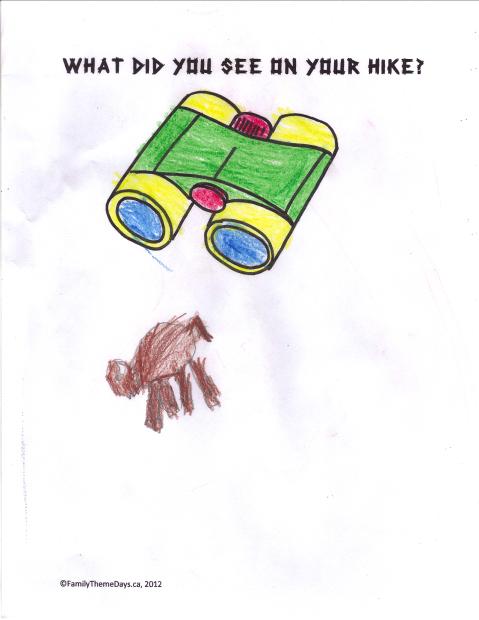
HIKING: Go to a park that offers hiking trails (like a National, State or Provincial Park) and go for a day trip. Pack some water and snacks and enjoy your family hike. Afterwards you could print out my “What Did You See on Your Hike” Worksheet and either have your kids draw a picture of something they saw or write about the hike.
CAMPING TRIP: Go camping for real. Book a camp site, dig out the tent, pack your bags and have a great time!
|

|
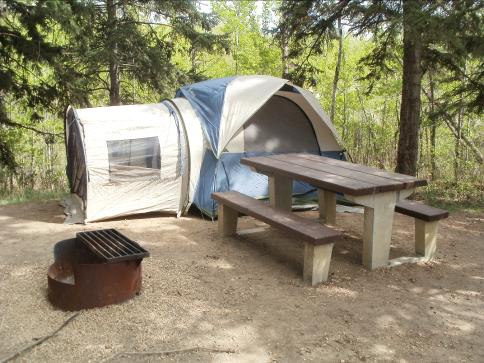
Let’s Go Camping! |
|
Photo: C Wright |
|
“Camp Out!” Coloring Page |
|
Journaling |

|
Hole Punch Picture: Camping at Night |
|
Happy Campers Tent Frame |

|
3-Dimensional Camping Scene |
|
Indoor Tent and Paper Roll Fire Craft |
|
Jar Lantern |
|
Nature Poster |
|
Camping Inspired Foods |
|
Compass Experiment |
|
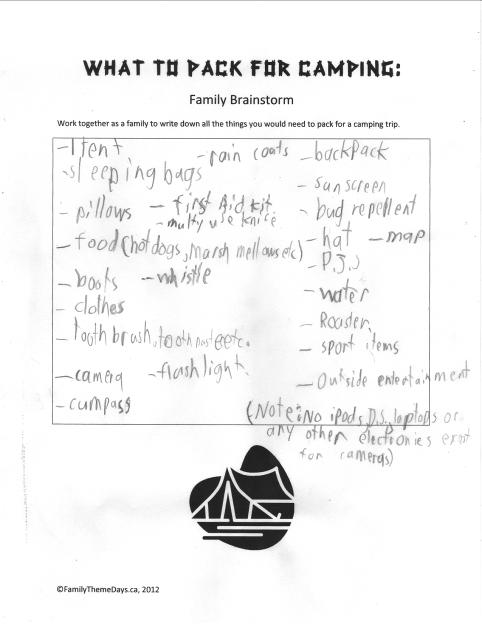
“What to Pack When You Camp” Printable |
|
Talk about camp fire safety! |
|
“What Did You See on Your Hike” Worksheet (My son’s drawing, age 6, of a buffalo)
|
|
|